Anatomy Drawing: How to Improve Your Anatomy (Guide, Reference & Practice)
Quick answer
Anatomy drawing means building the body from the inside out: gesture first, then proportions, a simple mannequin of head, rib cage and pelvis, the bony landmarks, and finally the major muscle groups. Learn it in that order, one body part at a time, and practice with short daily sessions that mix drawing from reference with drawing from memory.
Anatomy drawing is the skill of drawing the human body so it looks like it has bones, weight and muscles inside it. You don’t need a medical vocabulary to get there. You need a short list of shapes, a few measuring points and a practice routine that turns knowledge into mileage. This guide gives you all three, in the order artists usually learn them, with 19 figures made for this page that you can study and copy: proportion charts, bony landmarks, muscle groups, reference views from three sides and an example practice page.
Every figure on this page was made for it: diagrams we drew in code, 3D renders of generic MakeHuman figures (in a plain gray bodysuit), and 19th-century public-domain anatomy plates with our own labels and highlights.
What anatomy drawing is
Anatomy drawing is drawing the body from the inside out. Instead of copying the outline you see, you ask what is underneath it: which bones set the proportions, which joints let it bend, which muscles bulge or stretch in this pose. Human anatomy drawing for artists stays practical. It only goes as deep as the structures that change the surface you draw.
That is why the same body anatomy drawing can look stiff or alive. A drawing that copies contours tends to look flat. A drawing that understands the rib cage as a tilted egg, the pelvis as a box and the knee as a hinge can be turned, bent and lit, even without a model in front of you.
Anatomy for artists vs medical anatomy
Anatomy for artists and medical anatomy cover the same body but answer different questions. Medical anatomy names every structure and explains what it does. Art anatomy asks a smaller question: what does this structure do to the shape, and how does it change when the figure moves?
So an artist can skip most of the deep muscles and every organ. What matters is:
- The skeleton’s big masses: skull, rib cage, pelvis, and the long bones of the arms and legs.
- Bony landmarks: points where bone sits just under the skin, such as the collarbones, elbows and kneecaps.
- Surface muscle groups: the large shapes you can see, like the chest, the shoulders, the thigh and the calf.
- How they move: which way joints bend, and what squashes or stretches when they do.
A useful test for any anatomy fact: if it doesn’t change the silhouette, the light and shadow, or the way a pose balances, you can learn it later.
Anatomy in art history
Artists have studied anatomy for centuries, and some of the best study material comes from them. Leonardo da Vinci filled notebooks with anatomical drawings; one study of the skull in the Royal Collection is dated 1489. Bernhard Siegfried Albinus published his engraved skeleton and muscle plates in Leiden in 1747, with a London edition in 1749. Paul Richer published Anatomie artistique in Paris in 1890, a book of anatomy for artists, and its plates are the base of several figures on this page.


Anatomy also became a subject in paintings. Rembrandt’s The Anatomy Lesson of Dr Nicolaes Tulp (1632, Mauritshuis, The Hague) shows Dr Tulp giving an anatomy lesson to a group of surgeons. You don’t need to study these paintings to draw anatomy, but they are a reminder that anatomy for art has always been about looking closely and drawing what you learn.
How to draw anatomy in 7 steps
This is the order most anatomy drawing tutorials follow, and the order that keeps a figure believable while you add detail. Each step builds on the one before. If a drawing goes wrong, go back one step, not forward.
Step 1: Start with the gesture
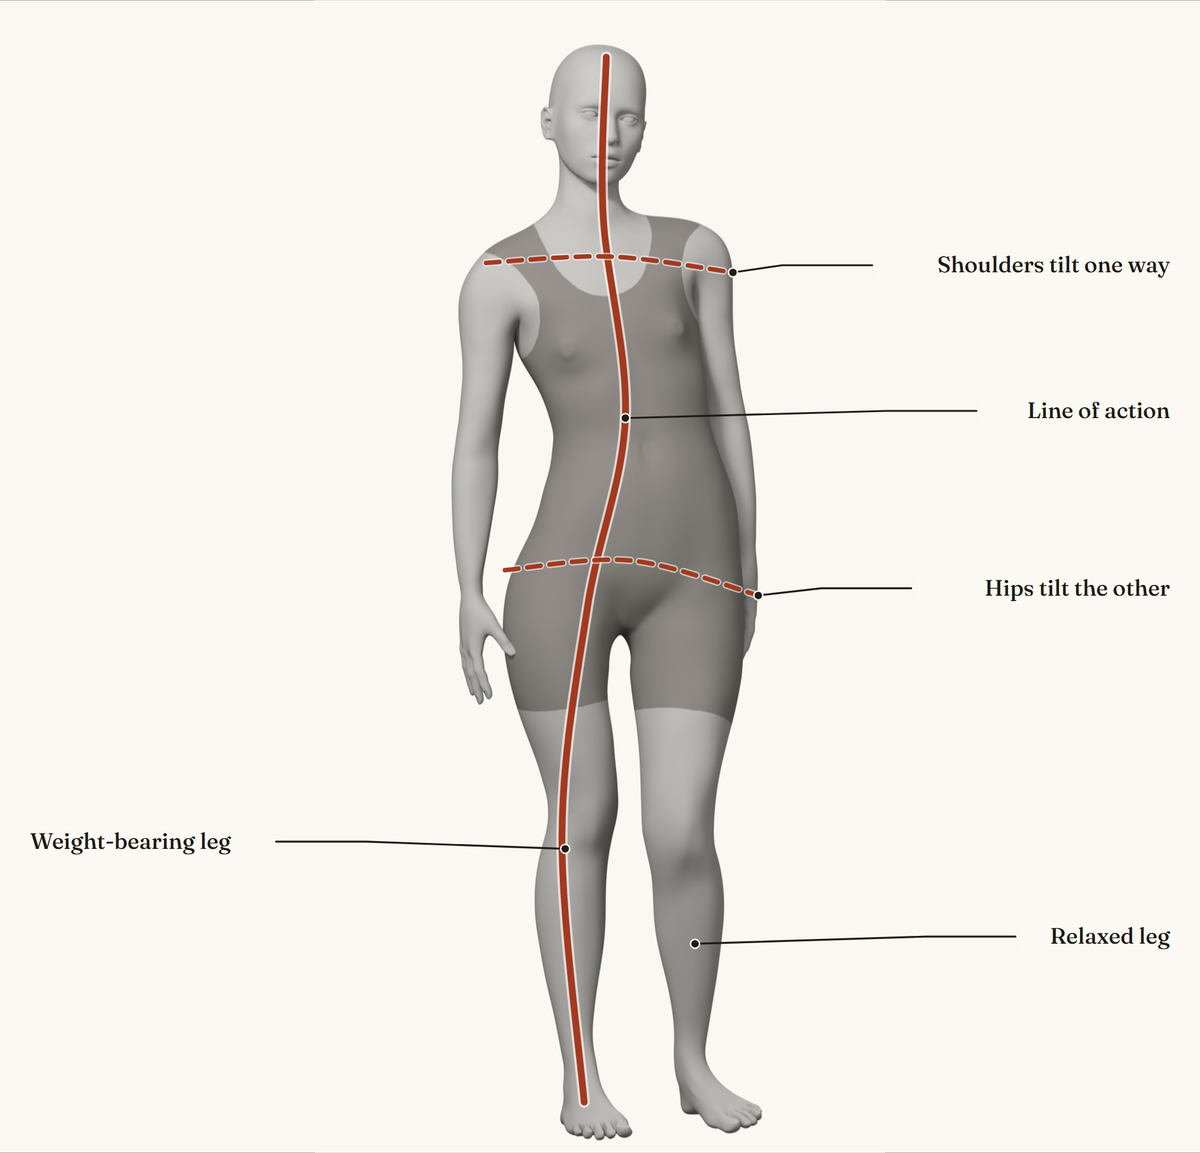
Before anatomy, find the movement. The line of action is one long curve that runs through the whole pose, usually from the head down the spine to the weight-bearing foot. Draw it first, in a few seconds, then hang the limbs from it.
Gesture drawing is a separate skill, and timed online pose tools make it easy to practice; our guide to gesture drawing sites covers them. For anatomy work, the rule is simple: if the gesture is wrong, no amount of muscle detail will fix the drawing.
Step 2: Block in the proportions
Proportions are measured in heads: the height of the head, from the top of the skull to the chin, is the unit for the whole body. Many drawing books teach an idealized adult that is eight heads tall. In that canon the chin sits at one head, the chest near two, the crotch at four and the knees near six. That canon is a convenient grid for constructing figures, and it is the grid in the diagram below.
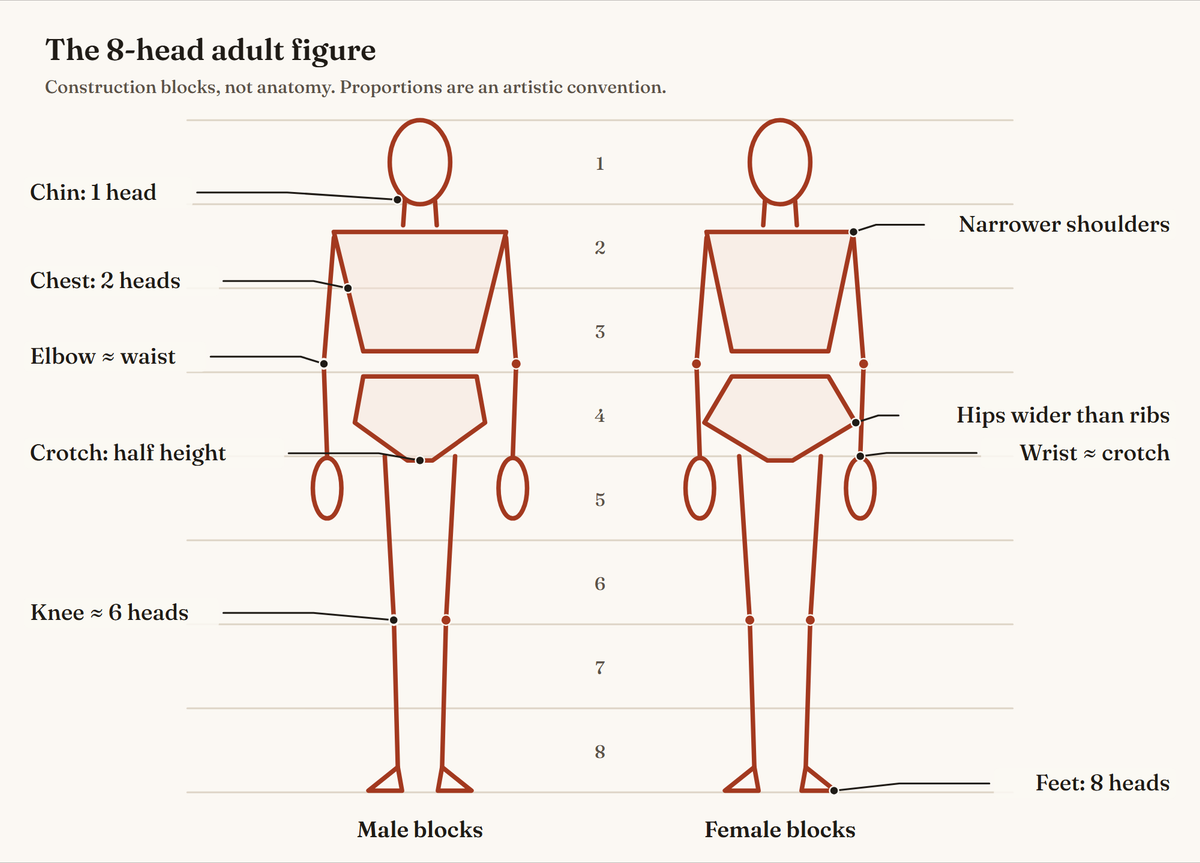
Real bodies don’t follow it exactly, and neither do our 3D figures. We measured the head height on each render and divided the full height by it: the male figure measures about 7.6 heads and the female figure about 7.8. Use the canon to construct, and measure your reference to check.
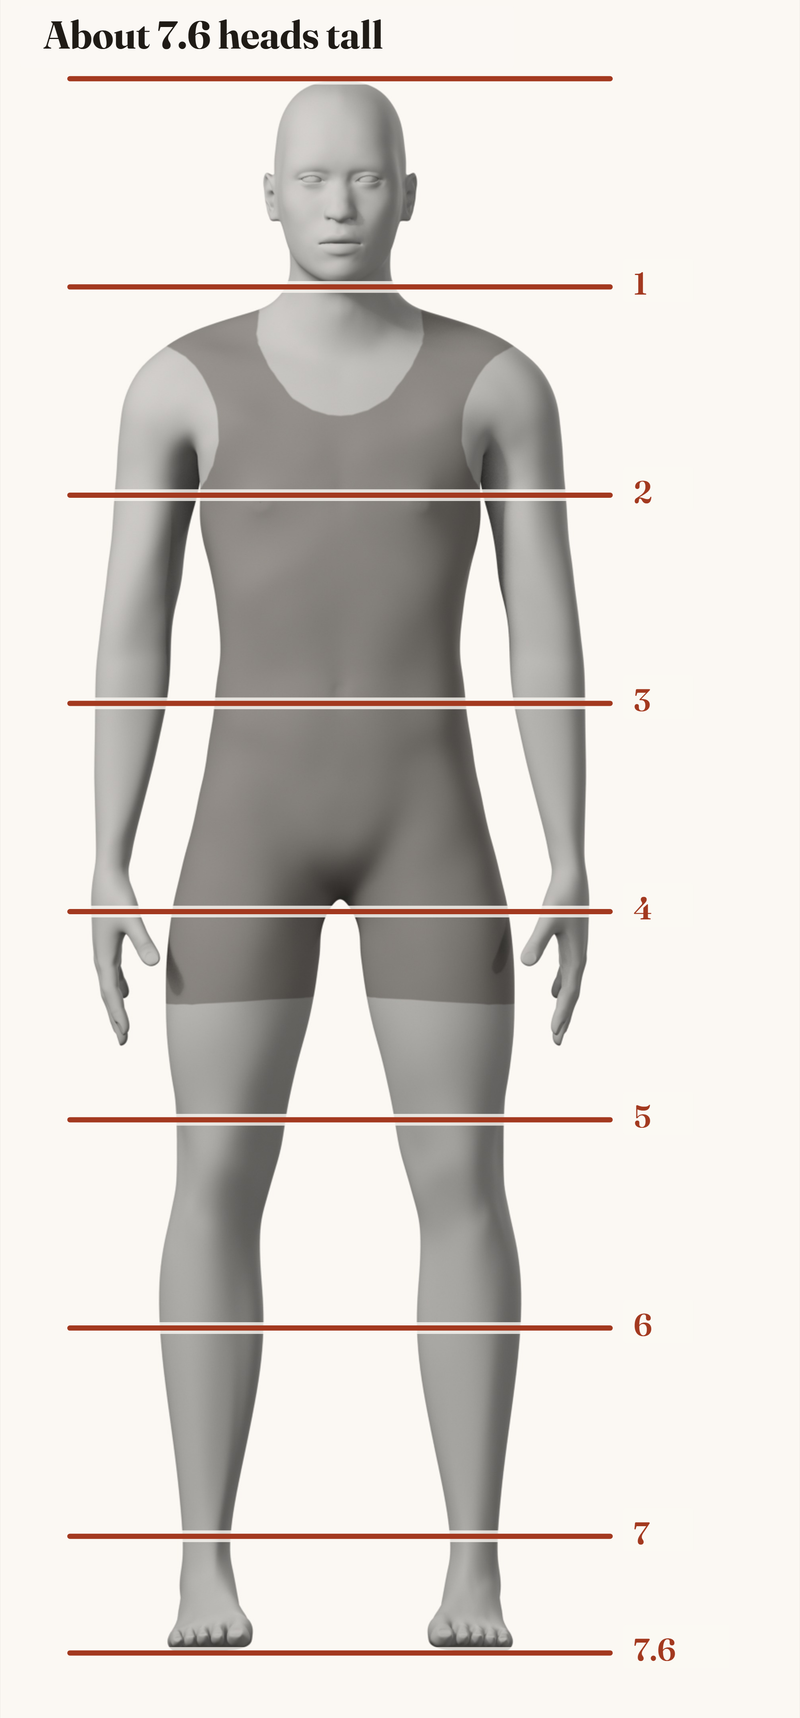
Male: about 7.6 heads
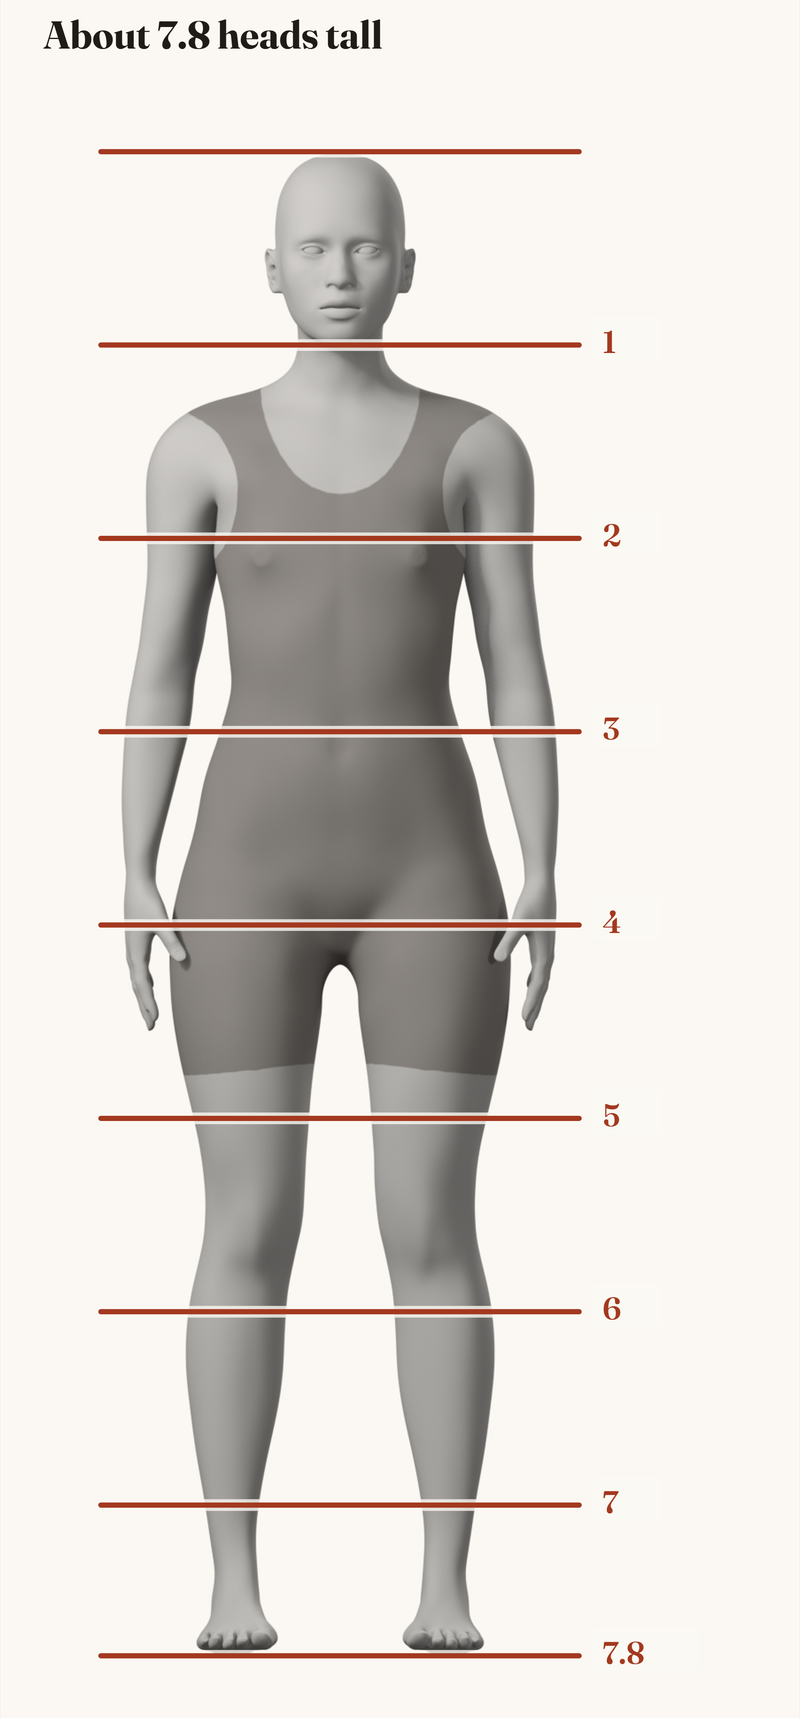
Female: about 7.8 heads
To measure your own reference: hold your pencil at arm’s length, mark the head height with your thumb, and count how many times it fits from the top of the head to the soles of the feet. The full method, with more landmarks, is the subject of our guide to body proportions for drawing.
Step 3: Build the mannequin: head, rib cage, pelvis
Now turn the gesture into a simple mannequin. Three masses carry the whole figure:
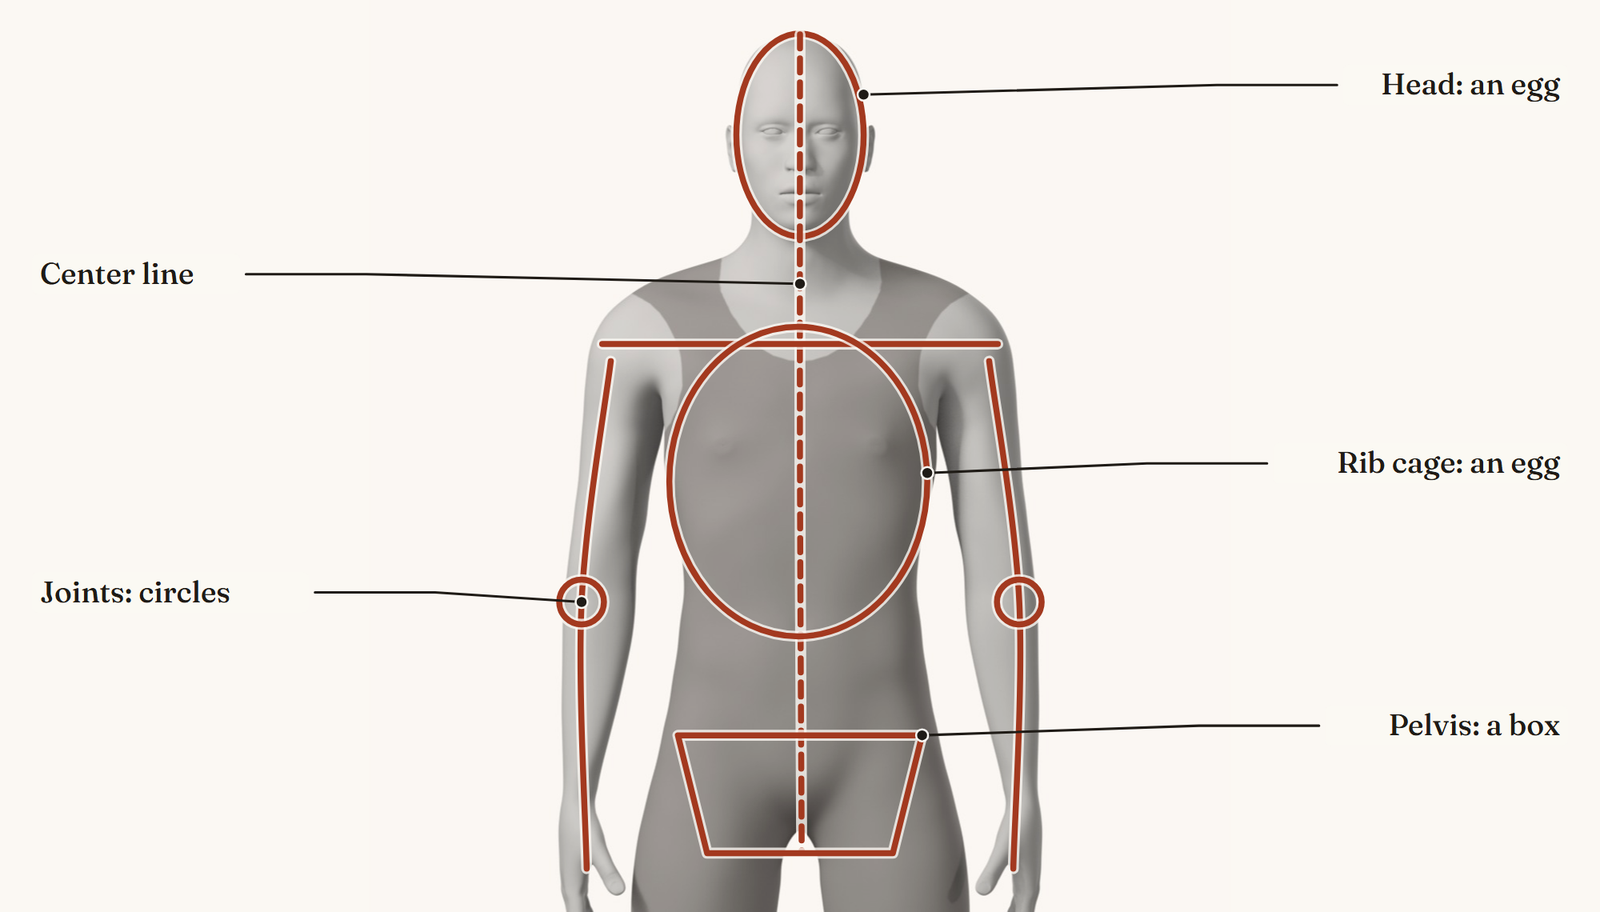
- The head: an egg, or a ball with a jaw attached.
- The rib cage: a larger egg, wider at the bottom, tilted slightly back.
- The pelvis: a box or bowl, tilted slightly forward.
The spine connects them and the waist is the flexible gap in between. Most of the movement in the torso happens there: the rib cage and pelvis twist, tilt and bend against each other. The hero image at the top of this page shows these shapes over a 3D figure.
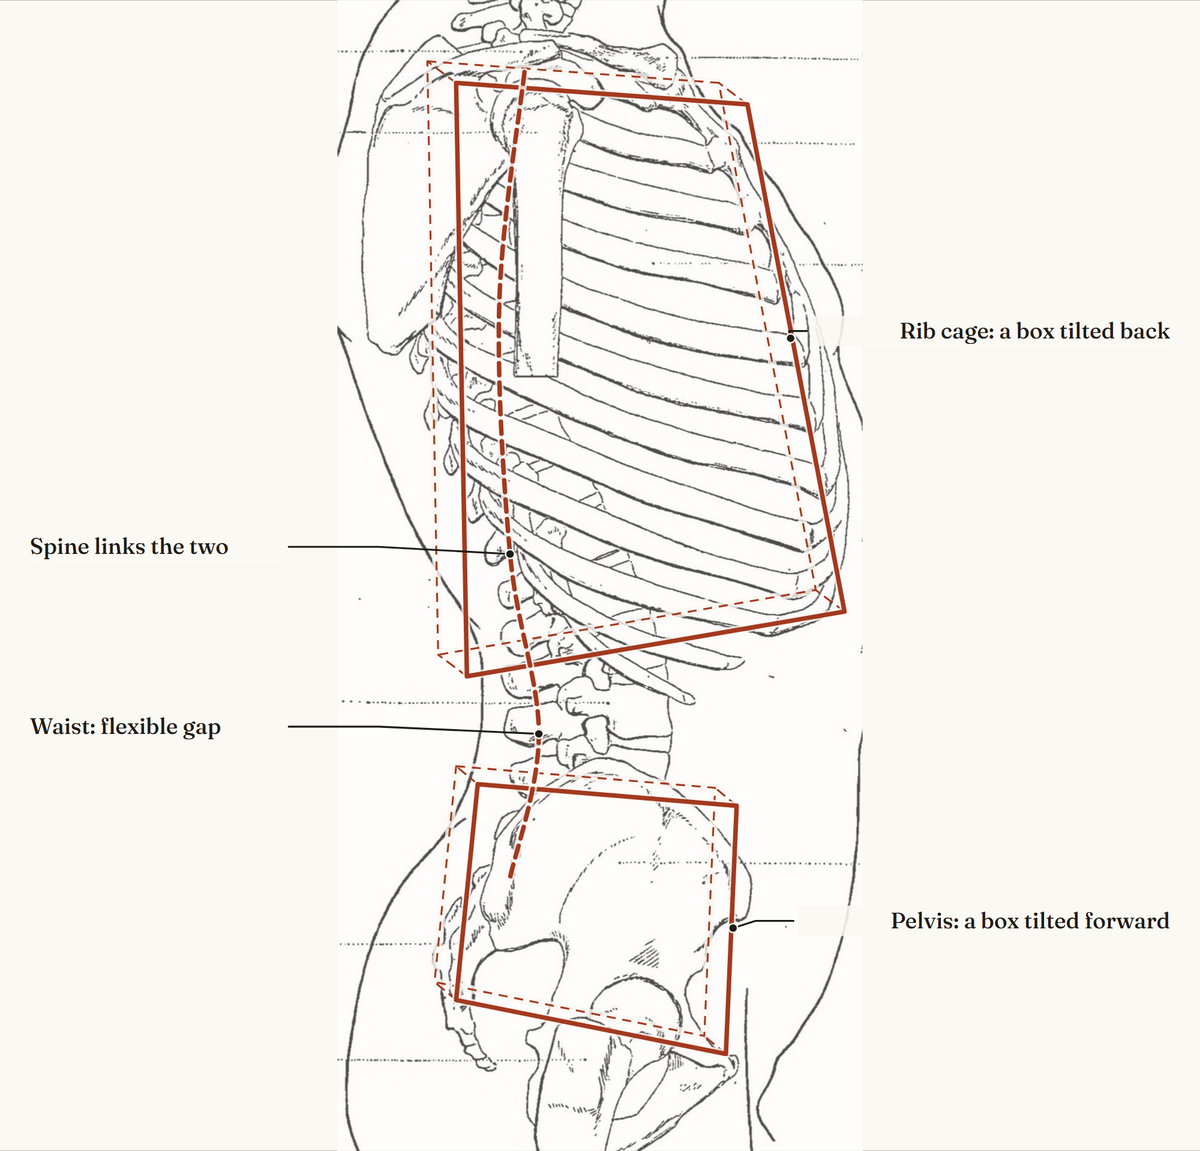
The limbs go on as tapered cylinders with circles for the shoulders, elbows, hips and knees. If you want a full walkthrough of this stage, see the mannequin method and our guide to drawing the torso.
Step 4: Find the bony landmarks
Bony landmarks are places where bone sits just under the skin. They show up as bumps, edges or dimples in every body type, lean or not, which makes them reliable measuring points. When a drawing feels off, checking these points is often the fastest fix.
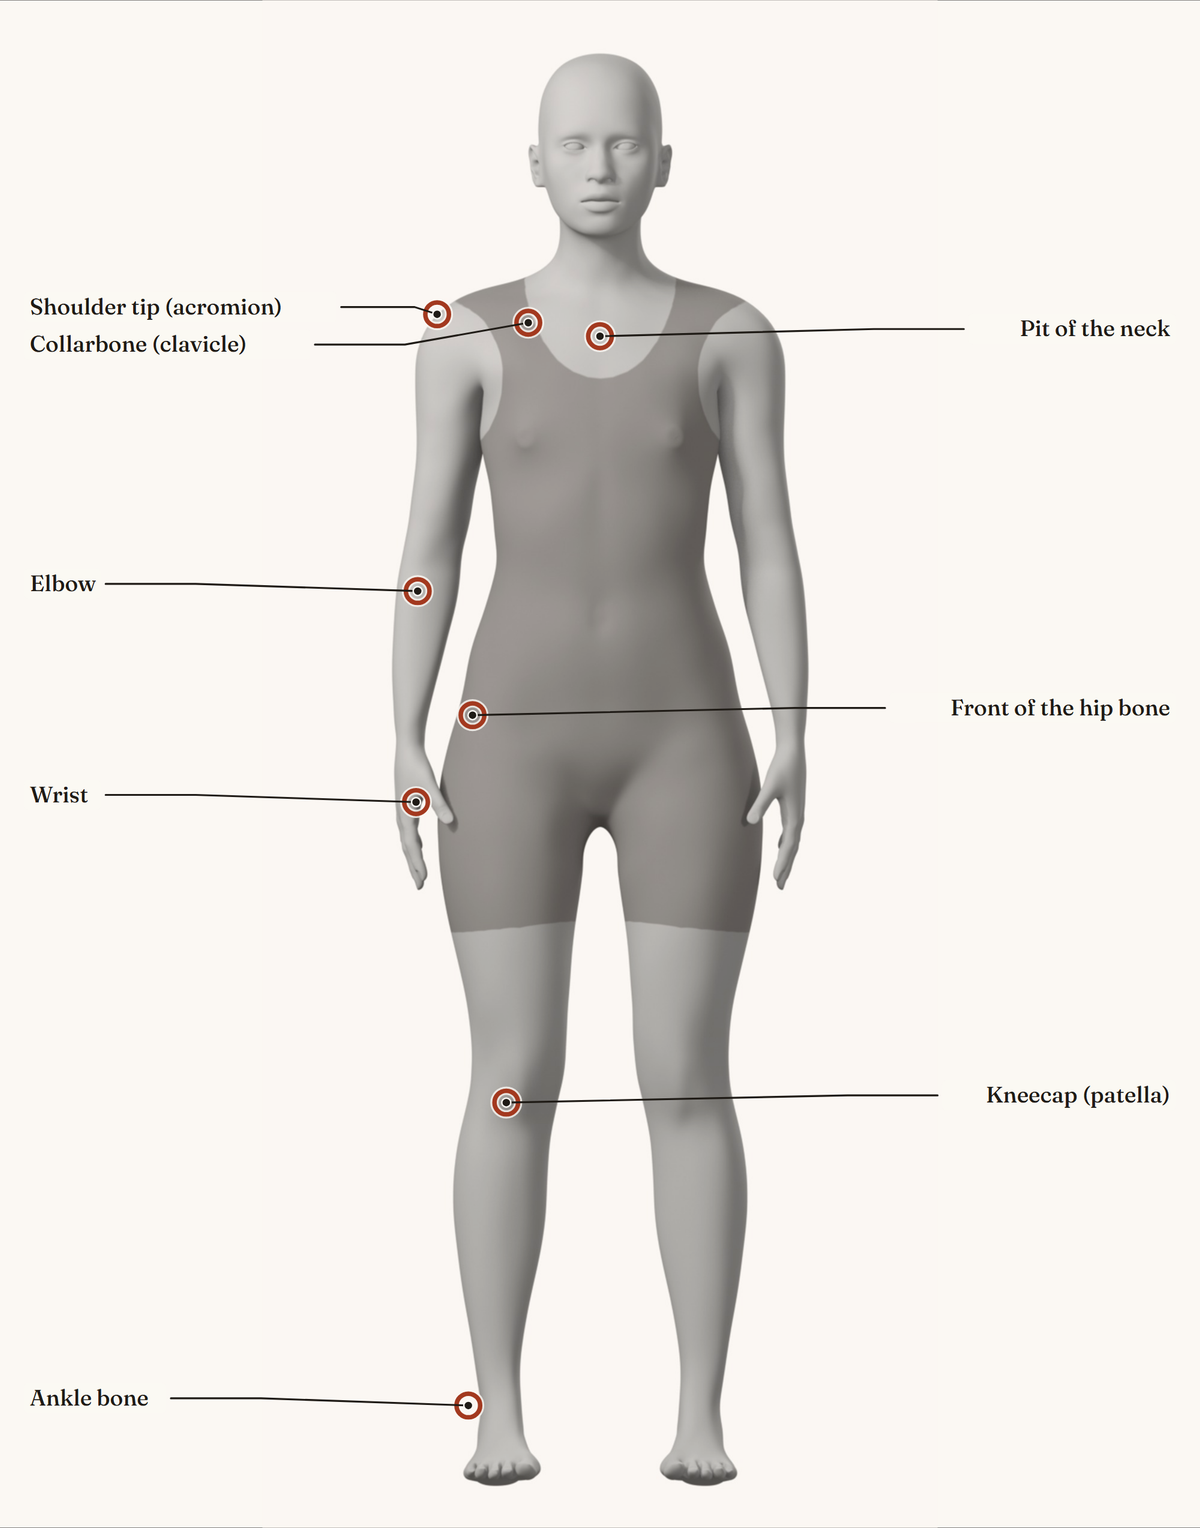
The ones to learn first:
- The pit of the neck between the collarbones, where the neck meets the chest.
- The collarbones (clavicles) running out to the shoulder tip (acromion).
- The elbow, whose bony point lines up roughly with the waist when the arm hangs.
- The wrist bones on the thumb and little-finger sides.
- The front of the hip bone (anterior superior iliac spine), the start of the pelvis box.
- The kneecap (patella) and the bony ankle bumps.
Behind these landmarks is the skeleton. The adult human skeleton usually has 206 named bones, according to the U.S. National Cancer Institute’s SEER training module on the divisions of the skeleton: 80 in the axial skeleton (skull, spine and rib cage) and 126 in the limbs and their girdles. You don’t need to memorize them. Learn the big ones and how they connect, and the rest can wait. Our guide to skeleton drawing for artists goes further.
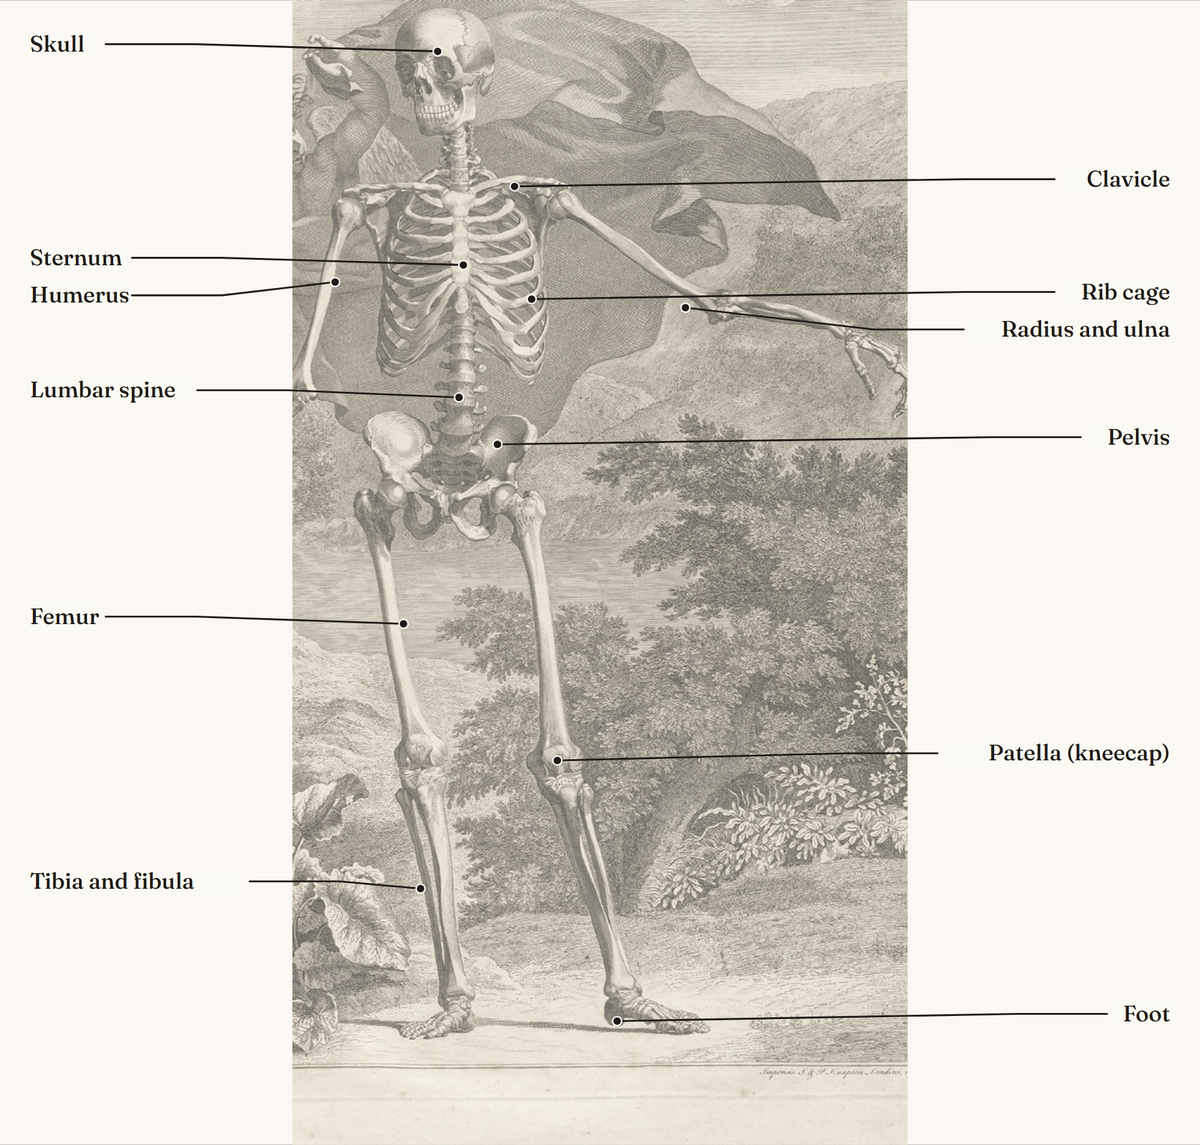
Step 5: Add the major muscle groups
Muscles attach to bones and move them, and they also hold posture. For muscle anatomy drawing, think in groups, not individual muscles: a few large shapes per body part, each with a direction that follows its fibers. Start with the front of the torso.
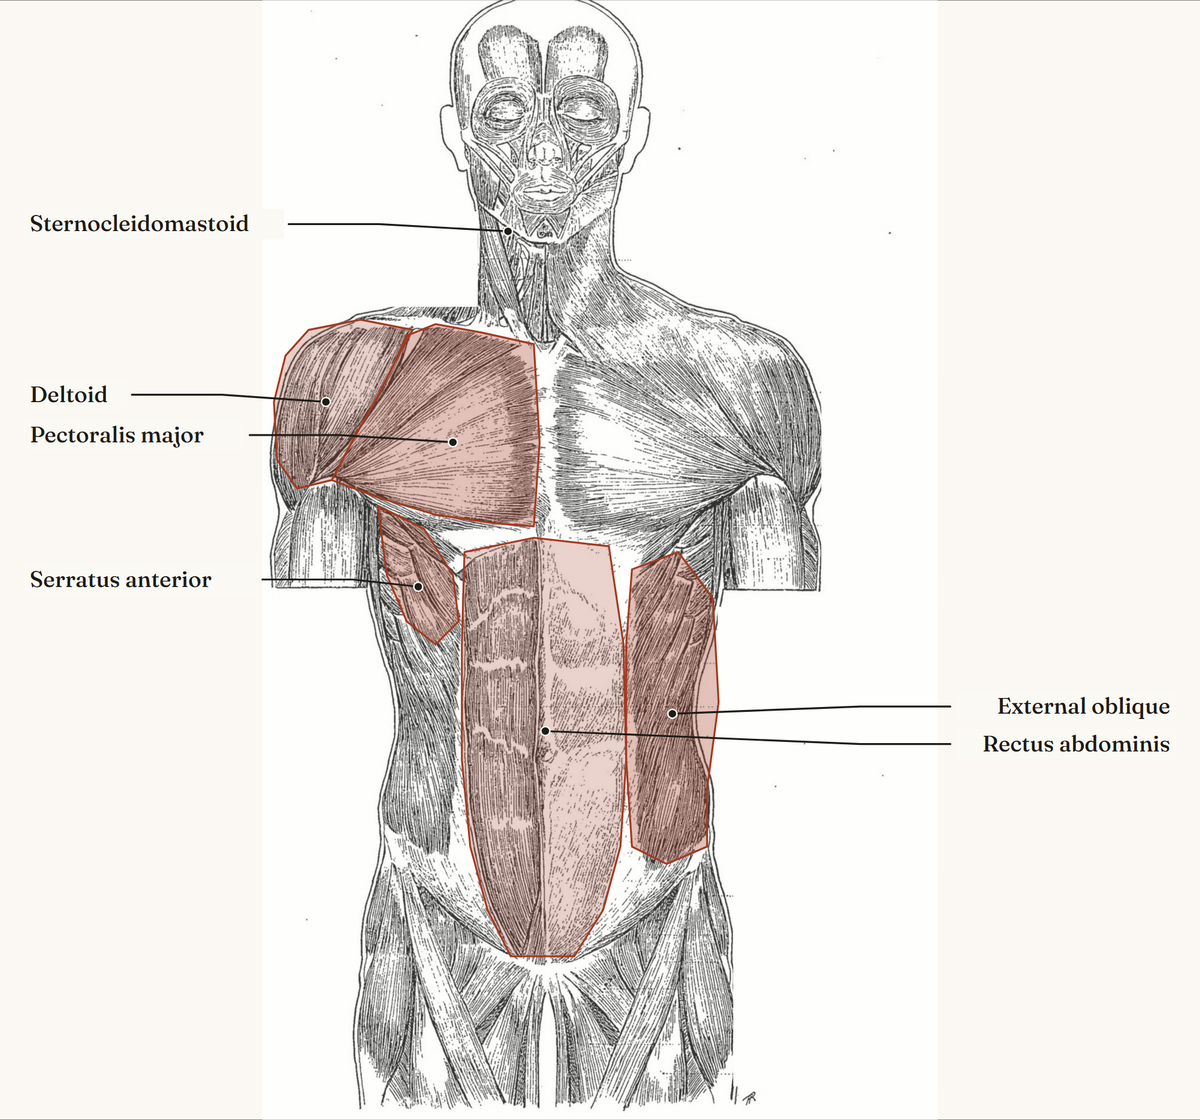
- Pectoralis major: the chest muscle, a fan from the breastbone and collarbone to the upper arm.
- Deltoid: the shoulder cap, wrapping over the top of the arm.
- Serratus anterior: the saw-tooth shapes along the side of the rib cage, below the armpit.
- Rectus abdominis: the long vertical band down the front of the abdomen.
- External oblique: the side of the waist, between the rib cage and the pelvis.
The back is simpler than it looks. Two muscles shape most of it: the trapezius, a diamond from the base of the skull to the middle of the back and out to the shoulders, and the latissimus dorsi, the wide sheet that wraps from the lower back up into the armpit.
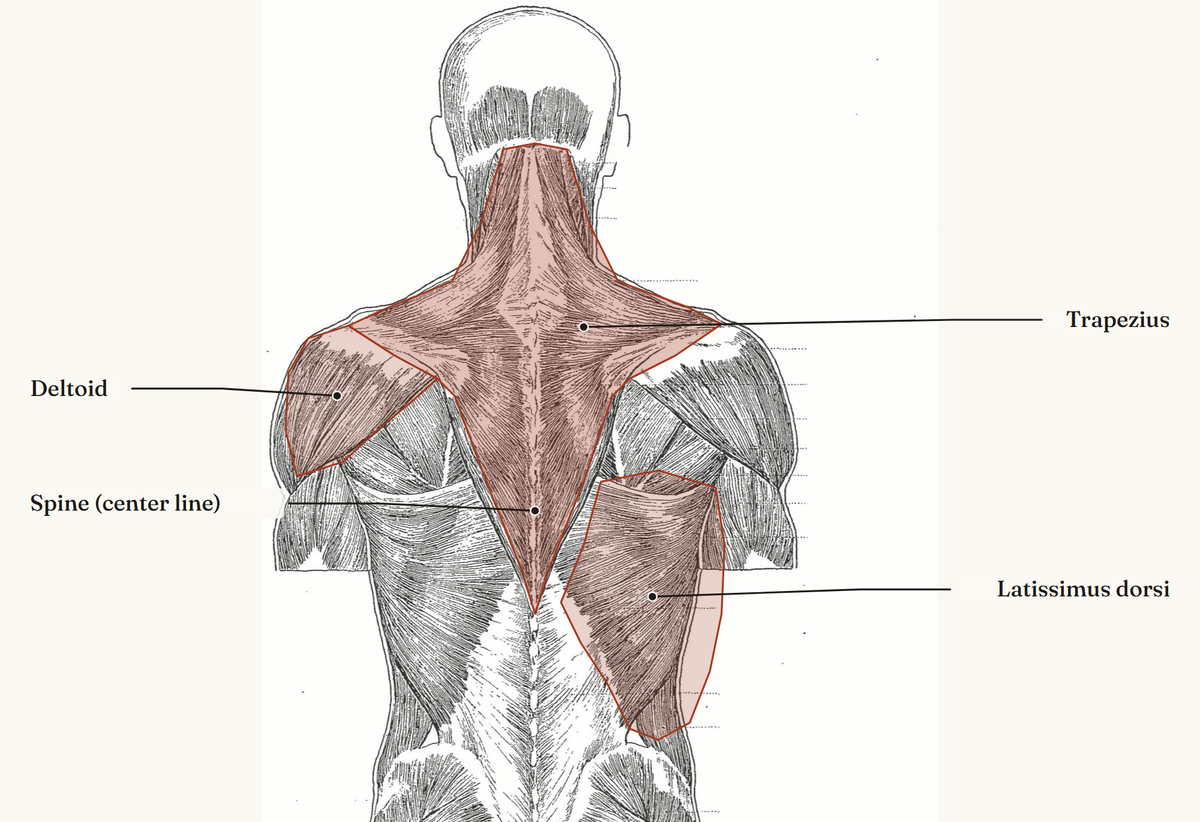
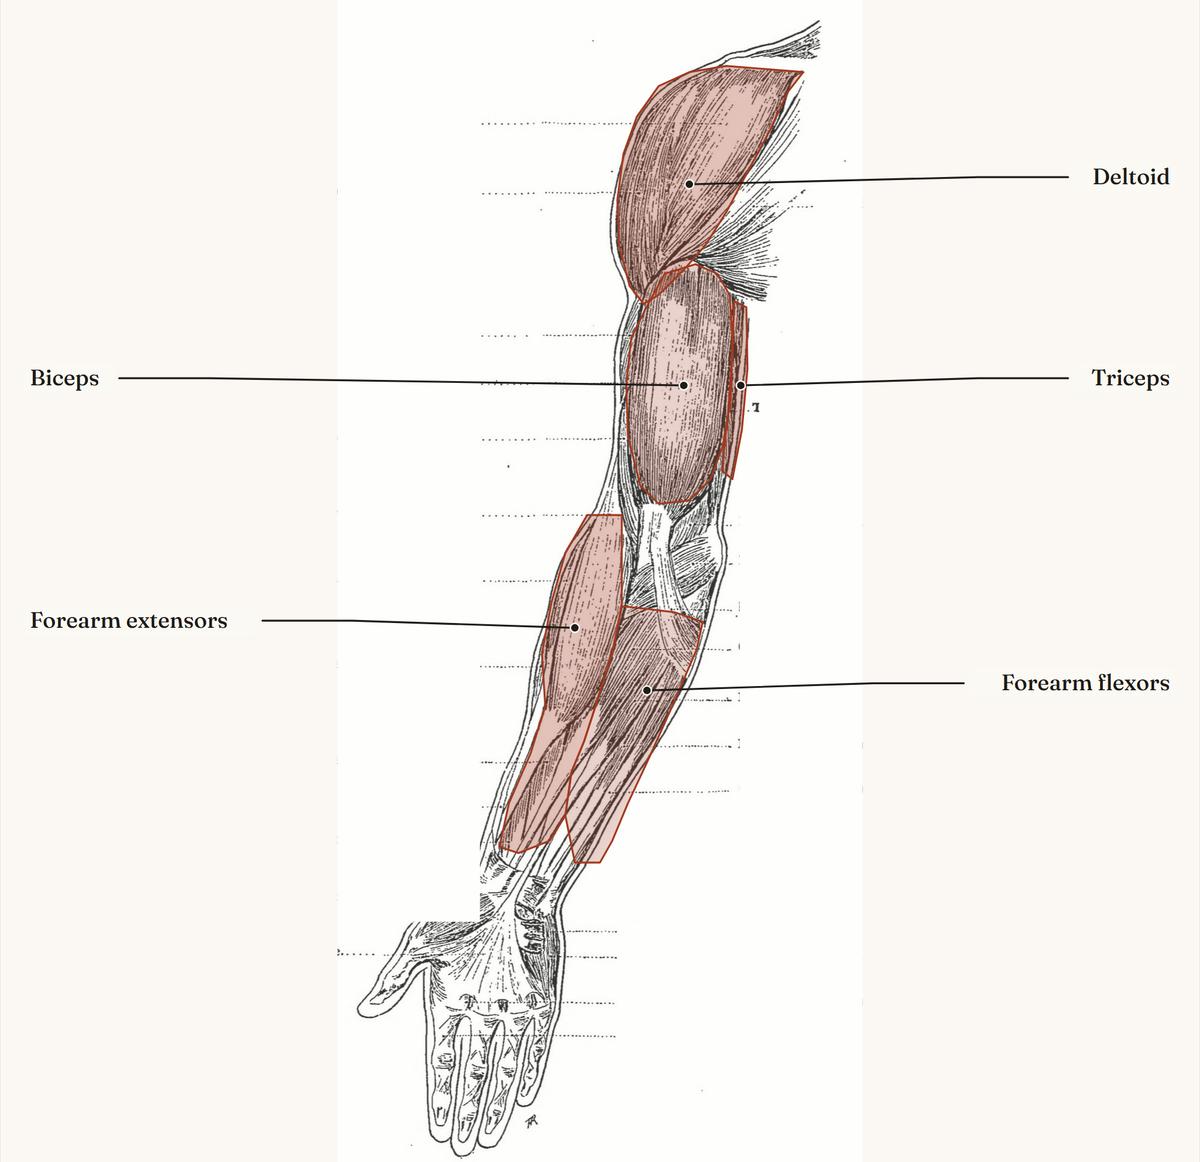
The arm reads as four groups: the deltoid at the shoulder, the biceps in front, the triceps behind, and the forearm, which splits into flexors (palm side) and extensors (back of the hand side).
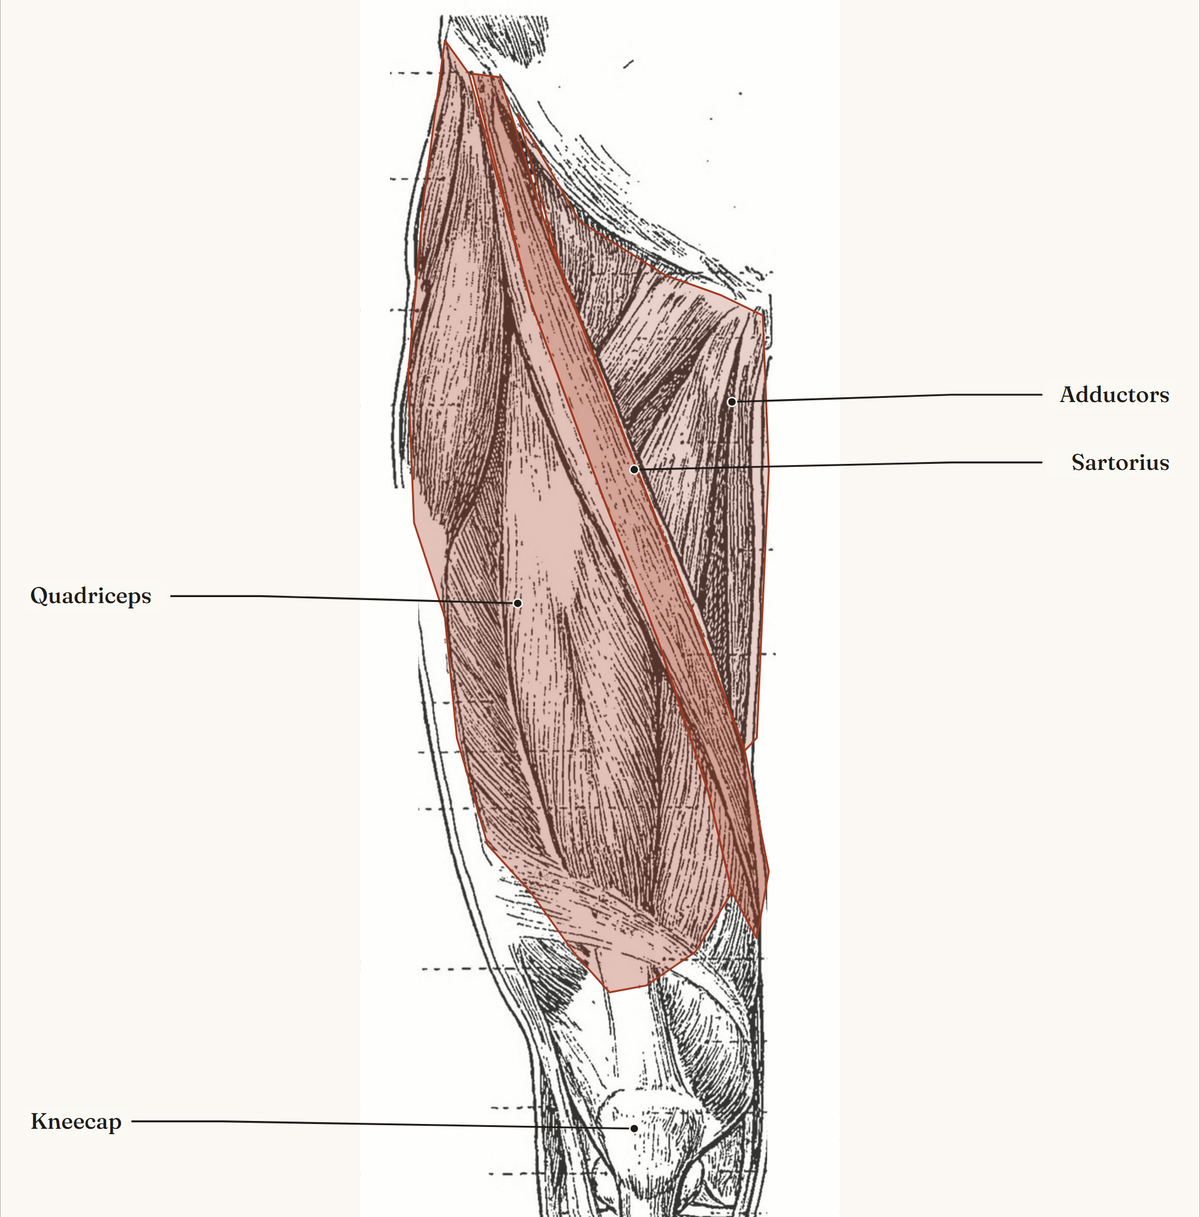
In the thigh, look for the long sartorius muscle, which crosses diagonally from the outer hip to the inner knee. It separates the quadriceps on the front and outside from the adductors on the inside. Below the knee, the calf on the back and the shin muscle in front shape the lower leg.
When you draw muscles, keep them subordinate to the form. Most of the time a muscle is a gentle change of plane, not an outlined shape. Our guide to muscle anatomy for artists covers each group in more detail.
Step 6: Head, hands and feet
These three areas get their own studies because they carry so much expression, and because small errors show.
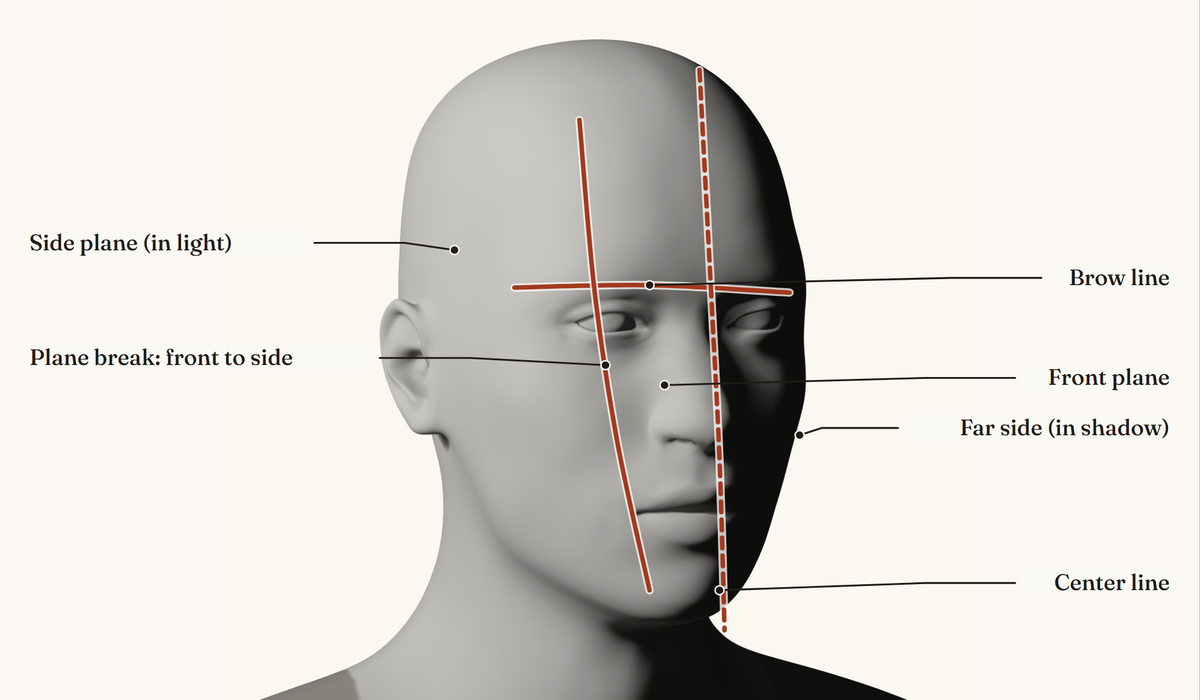
The head. Treat it as a ball with a jaw, then find its planes: a front plane for the face, side planes from the temples down past the cheekbones, and a brow line that wraps around the form. A single light from the side makes the planes easy to see.
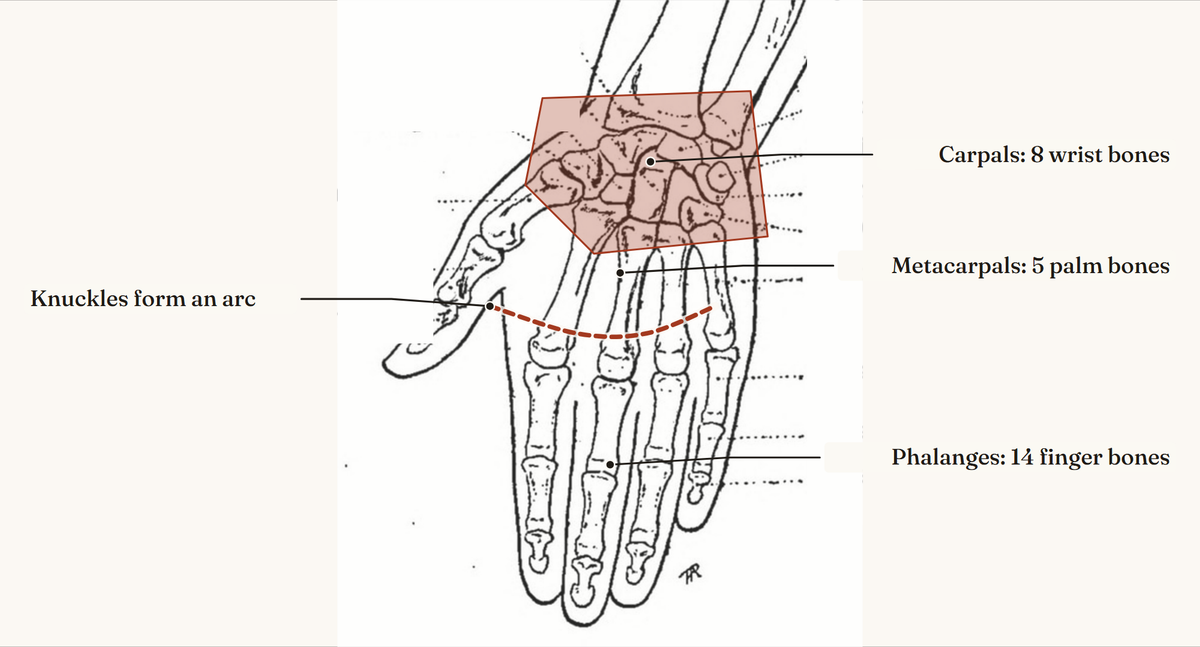
The hands. Each hand has 27 bones in three groups, according to the NCI SEER list of the appendicular skeleton: 8 carpals in the wrist, 5 metacarpals in the palm and 14 phalanges in the fingers. For drawing, think of the palm as a slightly curved box and the fingers as segments that taper. The knuckles form an arc, so the fingers never line up straight. How to draw hands takes this further.
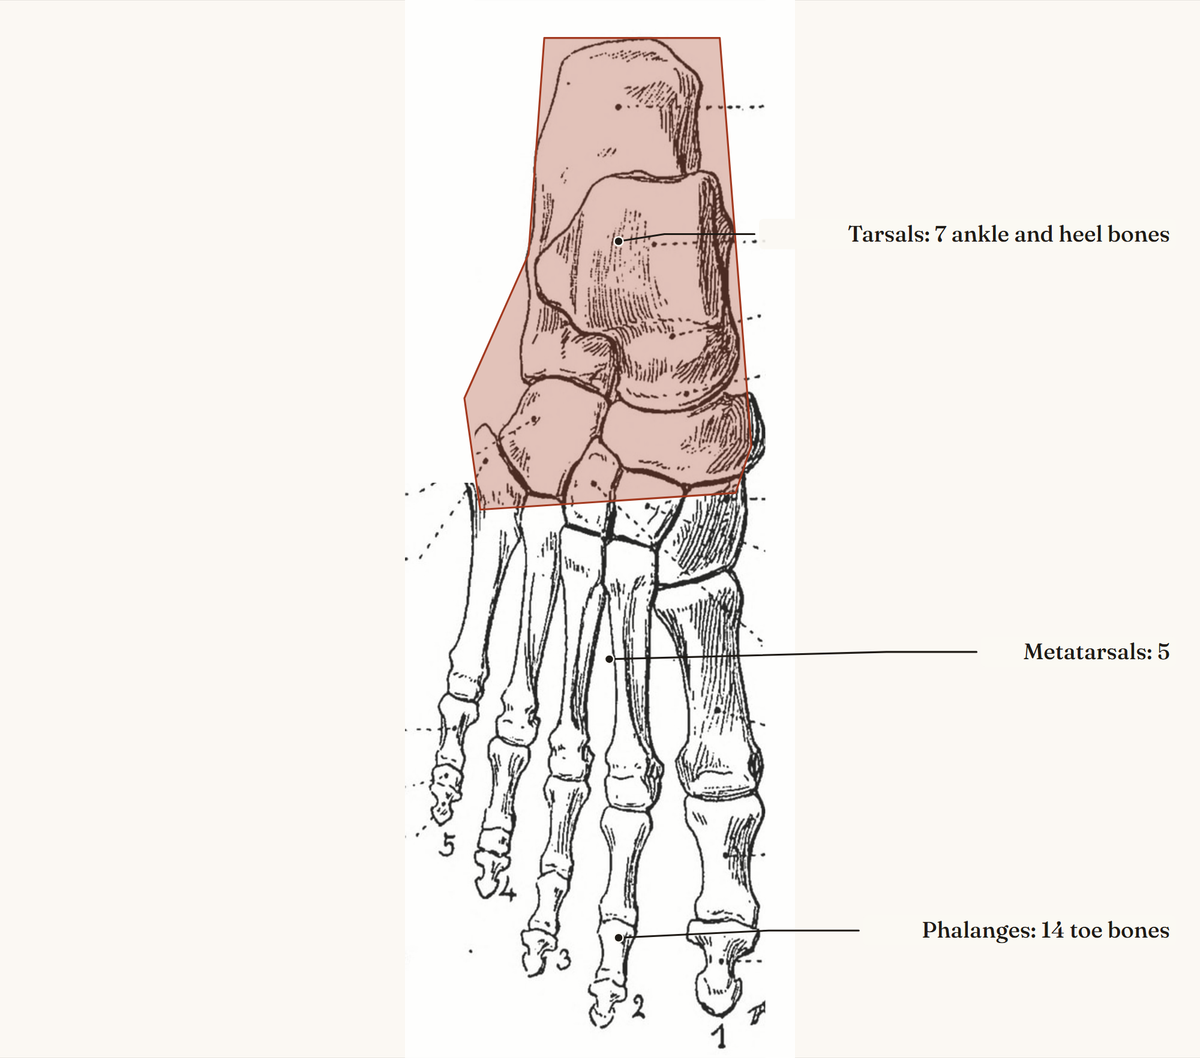
The feet. Each foot has 26 bones by the same count: 7 tarsals in the ankle and heel, 5 metatarsals and 14 phalanges. Draw the foot as a wedge: a solid heel and ankle block, an arch on the inside, and toes that grip the ground.
For the face itself, see face anatomy for artists.
Step 7: Weight, balance and foreshortening
A figure only looks right if it stands. When a person puts most of their weight on one leg, the hip on that side rises, the shoulders tilt the opposite way and the head stays over the weight-bearing foot. Sculptors call this pose contrapposto.
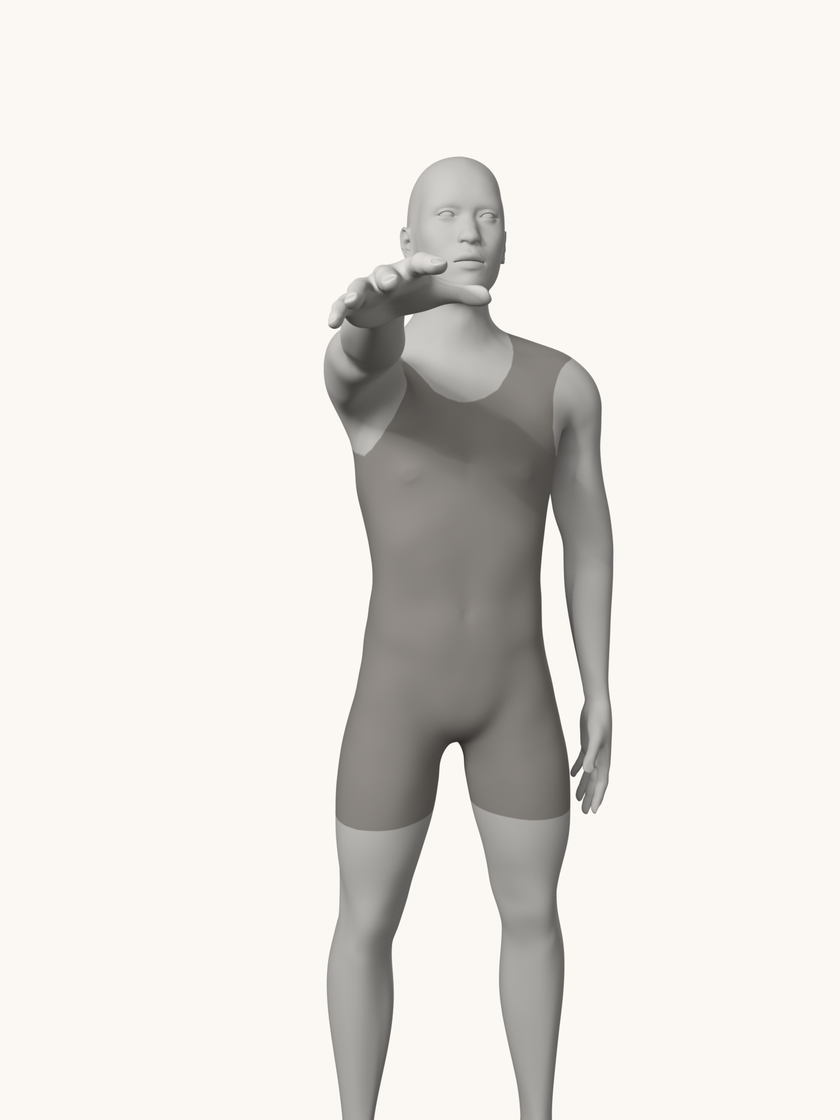
Anatomy and perspective meet in foreshortening. When a limb points toward you, it looks shorter, its near end looks bigger and its forms overlap. Draw it as a series of overlapping cylinders and ellipses rather than an outline, and let the near form cut in front of the far one.
Female vs male anatomy: what changes in a drawing
Woman anatomy drawing uses the same skeleton, the same muscle groups and the same construction steps. What changes is mostly proportion and the soft forms over the muscles, and it varies from person to person as much as it varies between sexes. These are tendencies to observe in your reference, not rules.
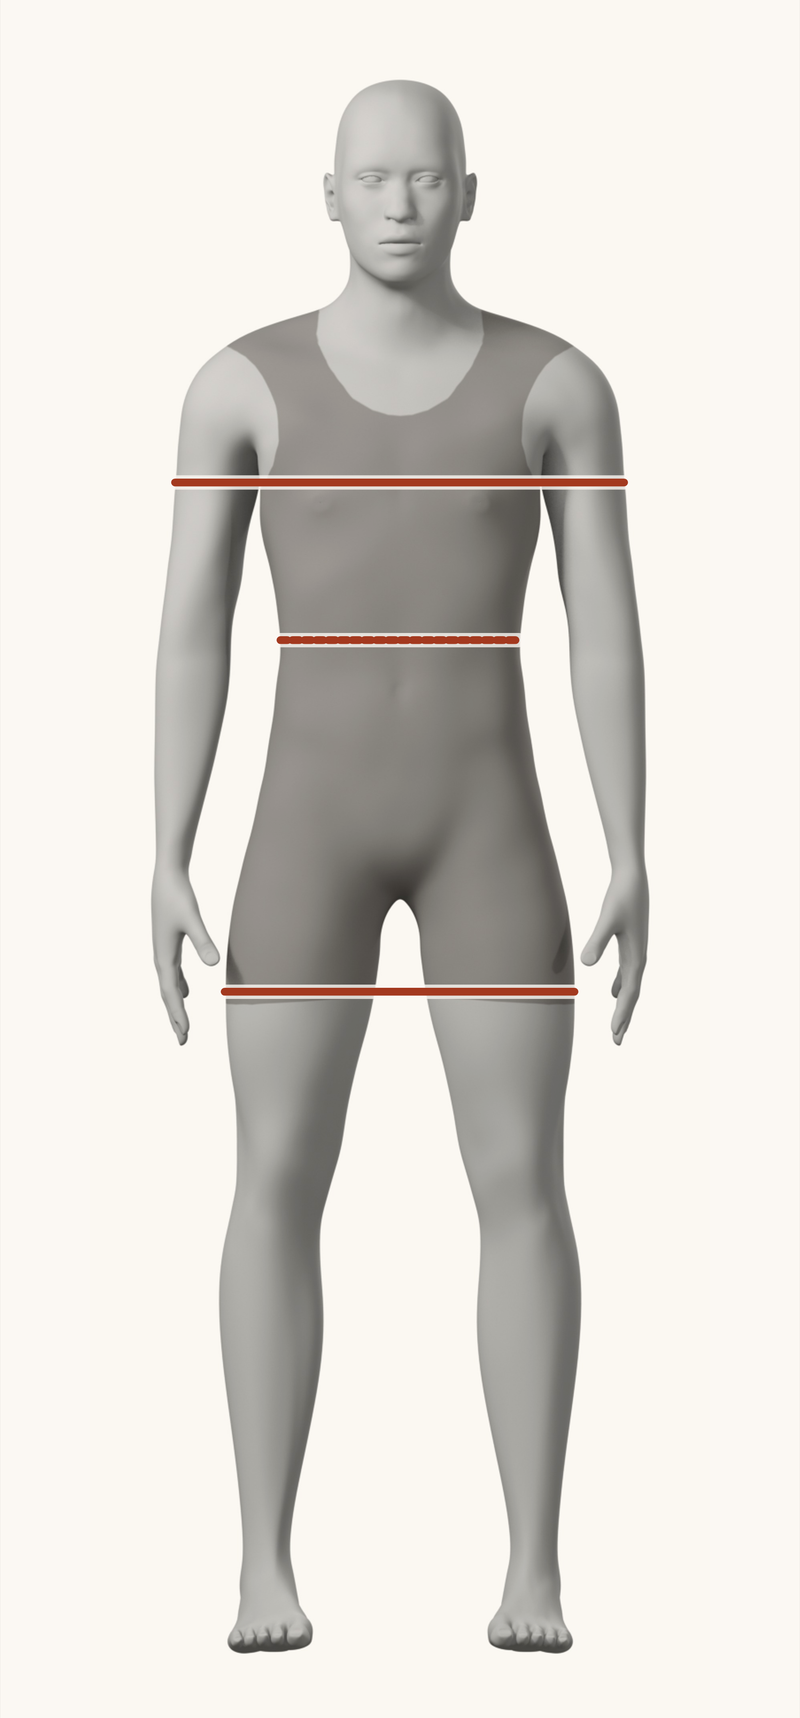
Male: shoulders much wider than hips
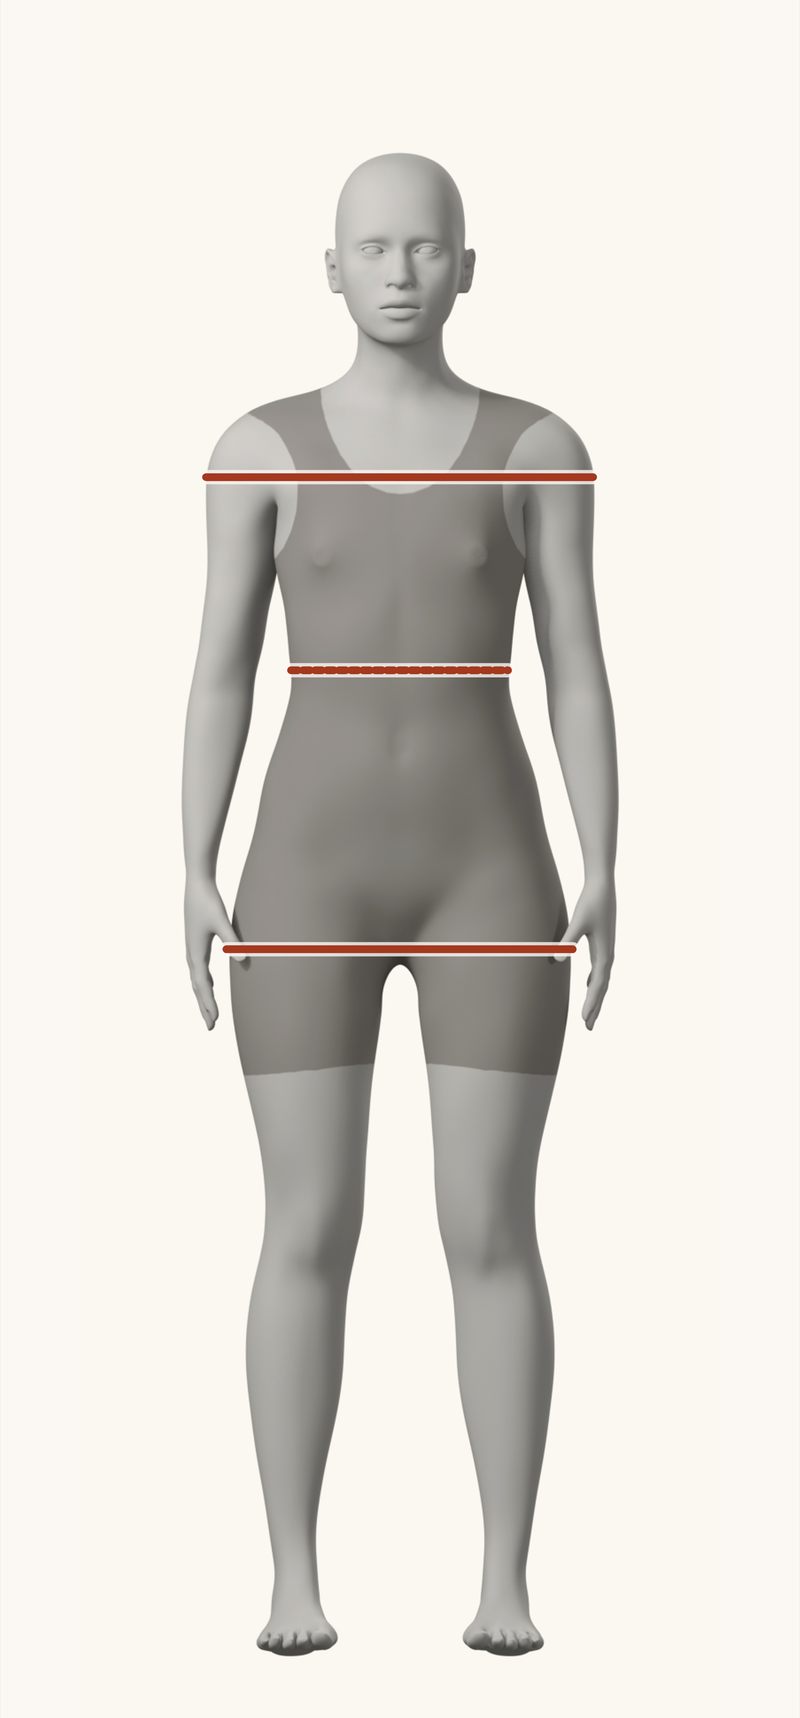
Female: shoulders and hips close in width
On our two 3D figures, measured from the renders:
- Shoulders vs hips: the male figure’s shoulders are about 1.3 times as wide as his hips; the female figure’s are about 1.1 times as wide as hers.
- Waist: the female figure’s waist is narrower relative to her hips (about 0.63 of the hip width, against about 0.68 for the male figure).
- Height in heads: about 7.8 for the female figure and 7.6 for the male, because the female head is smaller relative to her height on these models.
Other differences artists often draw: softer transitions between muscle groups, a different angle where the thigh meets the hip, and breast forms that sit on top of the pectoral muscle and follow gravity and pose. Female muscle anatomy drawing uses the same muscle map as the male figure; the forms are usually less defined at the surface.
The details deserve their own pages: female anatomy drawing and male anatomy drawing.
Anatomy drawing reference: front, side and back
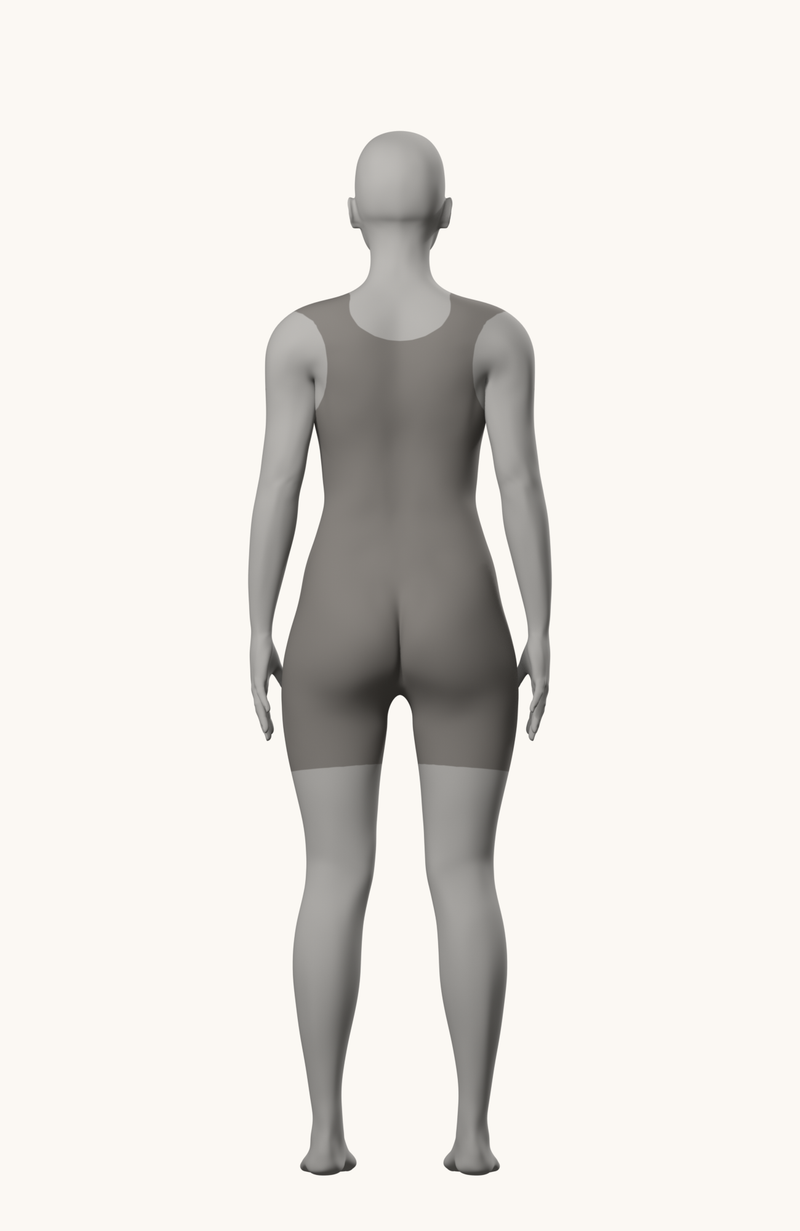
Good anatomy drawing reference shows the same body from several sides in neutral light. That lets you see how a form you know from the front turns into the side view, which is where most construction errors hide. Use these three views of one standing pose as a starting point.
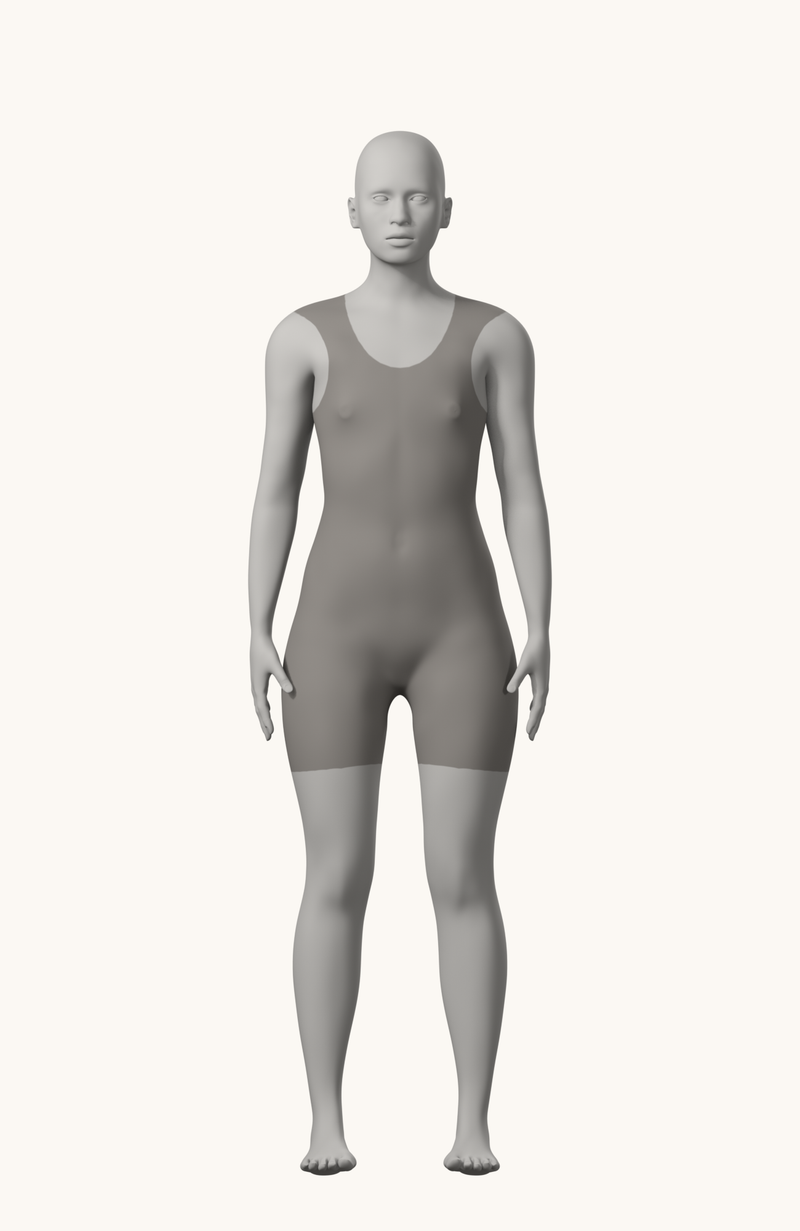
Front
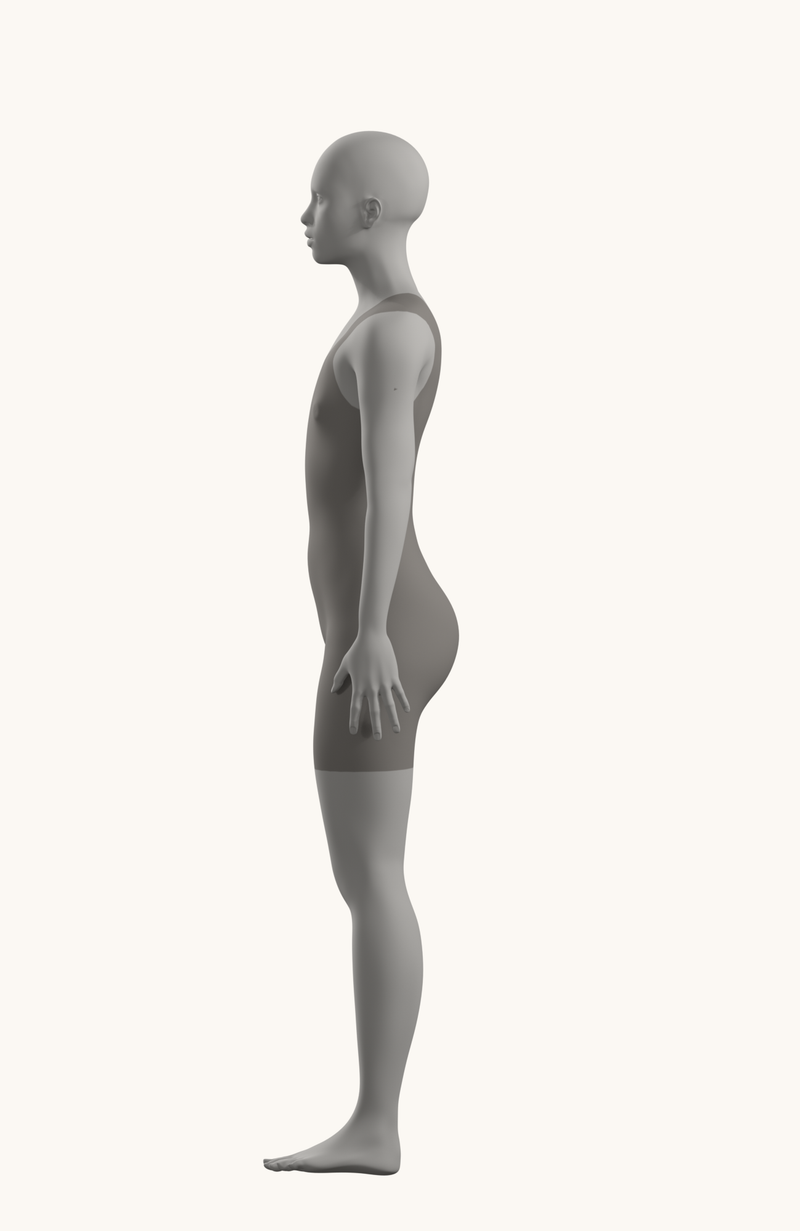
Side
Back
What to look for in the side view: the S-curve of the spine, the rib cage leaning back over the pelvis, the knees slightly behind the line of the thigh, and the way the weight sits over the middle of the foot. In the back view, find the shoulder blades, the spine, and the two dimples over the back of the pelvis.
When you choose other anatomy art reference, prefer photos with one clear light source, a full figure in frame, and a pose you understand. Timed pose sites are good for gesture; 3D models and anatomy books are better for structure.
Make your own anatomy reference sheet
Concept artists often keep an anatomy sheet for a character or a body type: front, side and back views, the head-height grid, and notes on the forms that matter for that design. You can build one from the figures on this page. Draw the three views above, add proportion lines measured in heads, mark the bony landmarks, and note anything you keep getting wrong. A sheet you drew yourself is a far better reference than one you saved, because you had to understand every line in it.
Anatomy sketches: a study-sketch gallery
Anatomy sketches are quick studies, not finished drawings. Their job is to make you understand one form. The fastest way to sketch anatomy is to draw the simple form first and then fit the anatomy into it: a ball and jaw for the head, an egg and box for the torso, cylinders for the limbs.
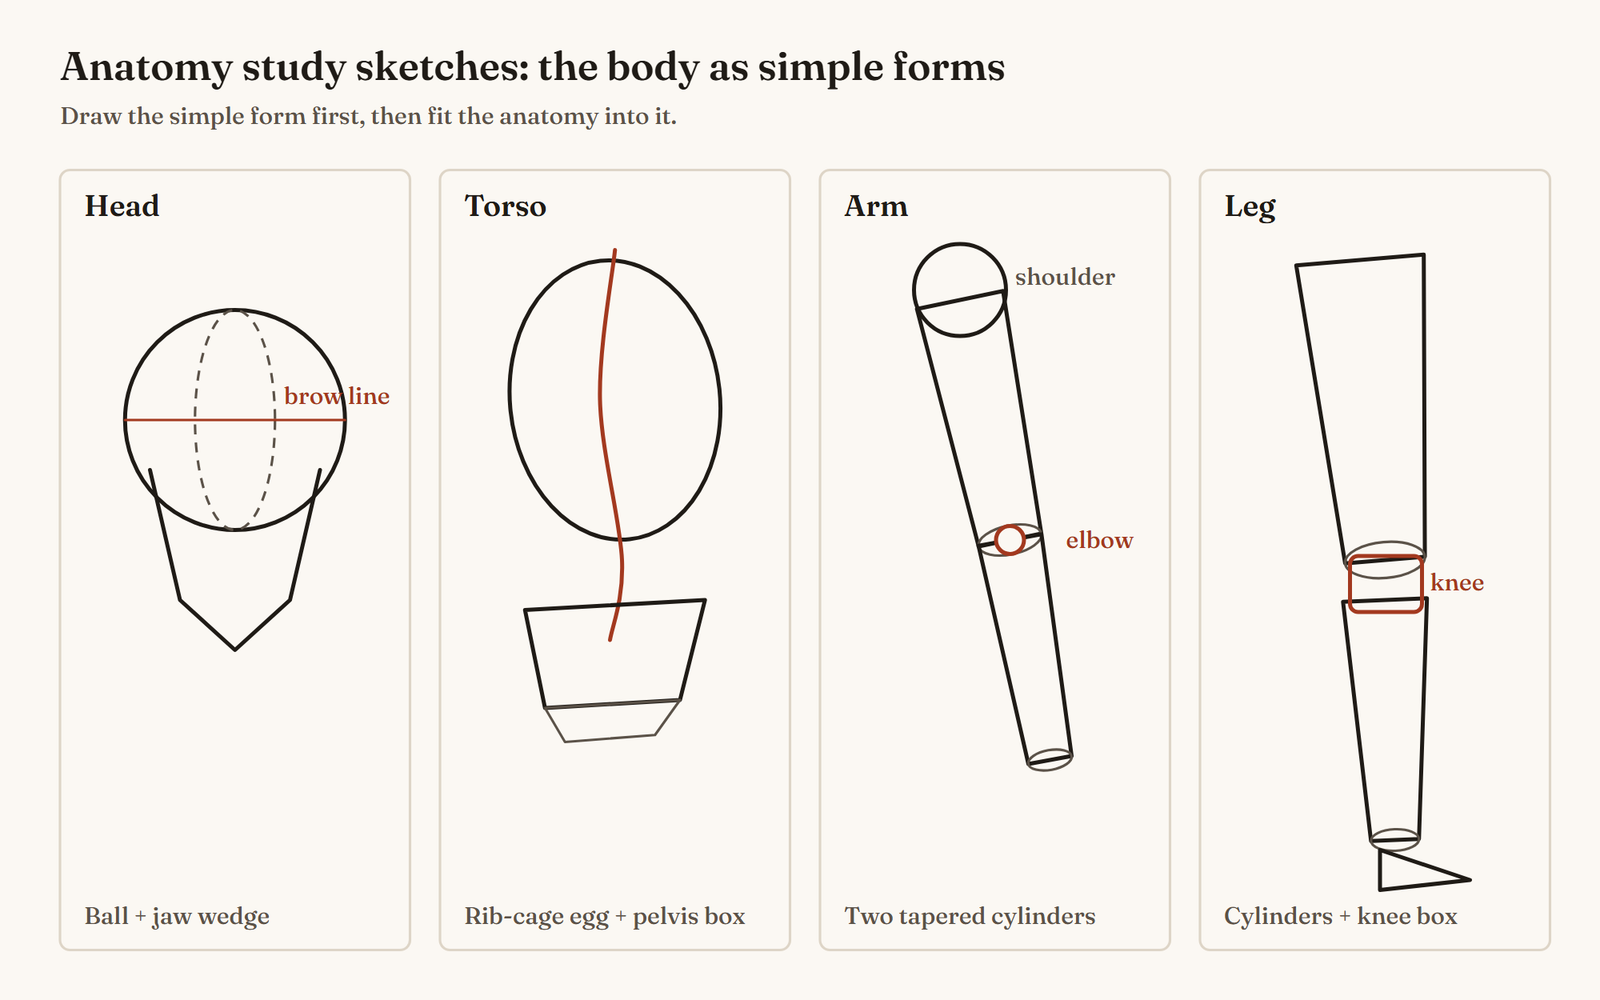
A good anatomy sketch session looks like this: pick one body part, draw it five to ten times from different angles in a few minutes each, and label what you learned on the page. The figures above (the rib cage boxes, the arm groups, the head planes) are all examples of what a study sketch is trying to capture.
Anatomy drawing practice: a weekly plan
Anatomy drawing practice works best in short, regular sessions with a clear goal. The page below shows one session on one pose: gesture, mannequin, one body part, and the same figure from memory.
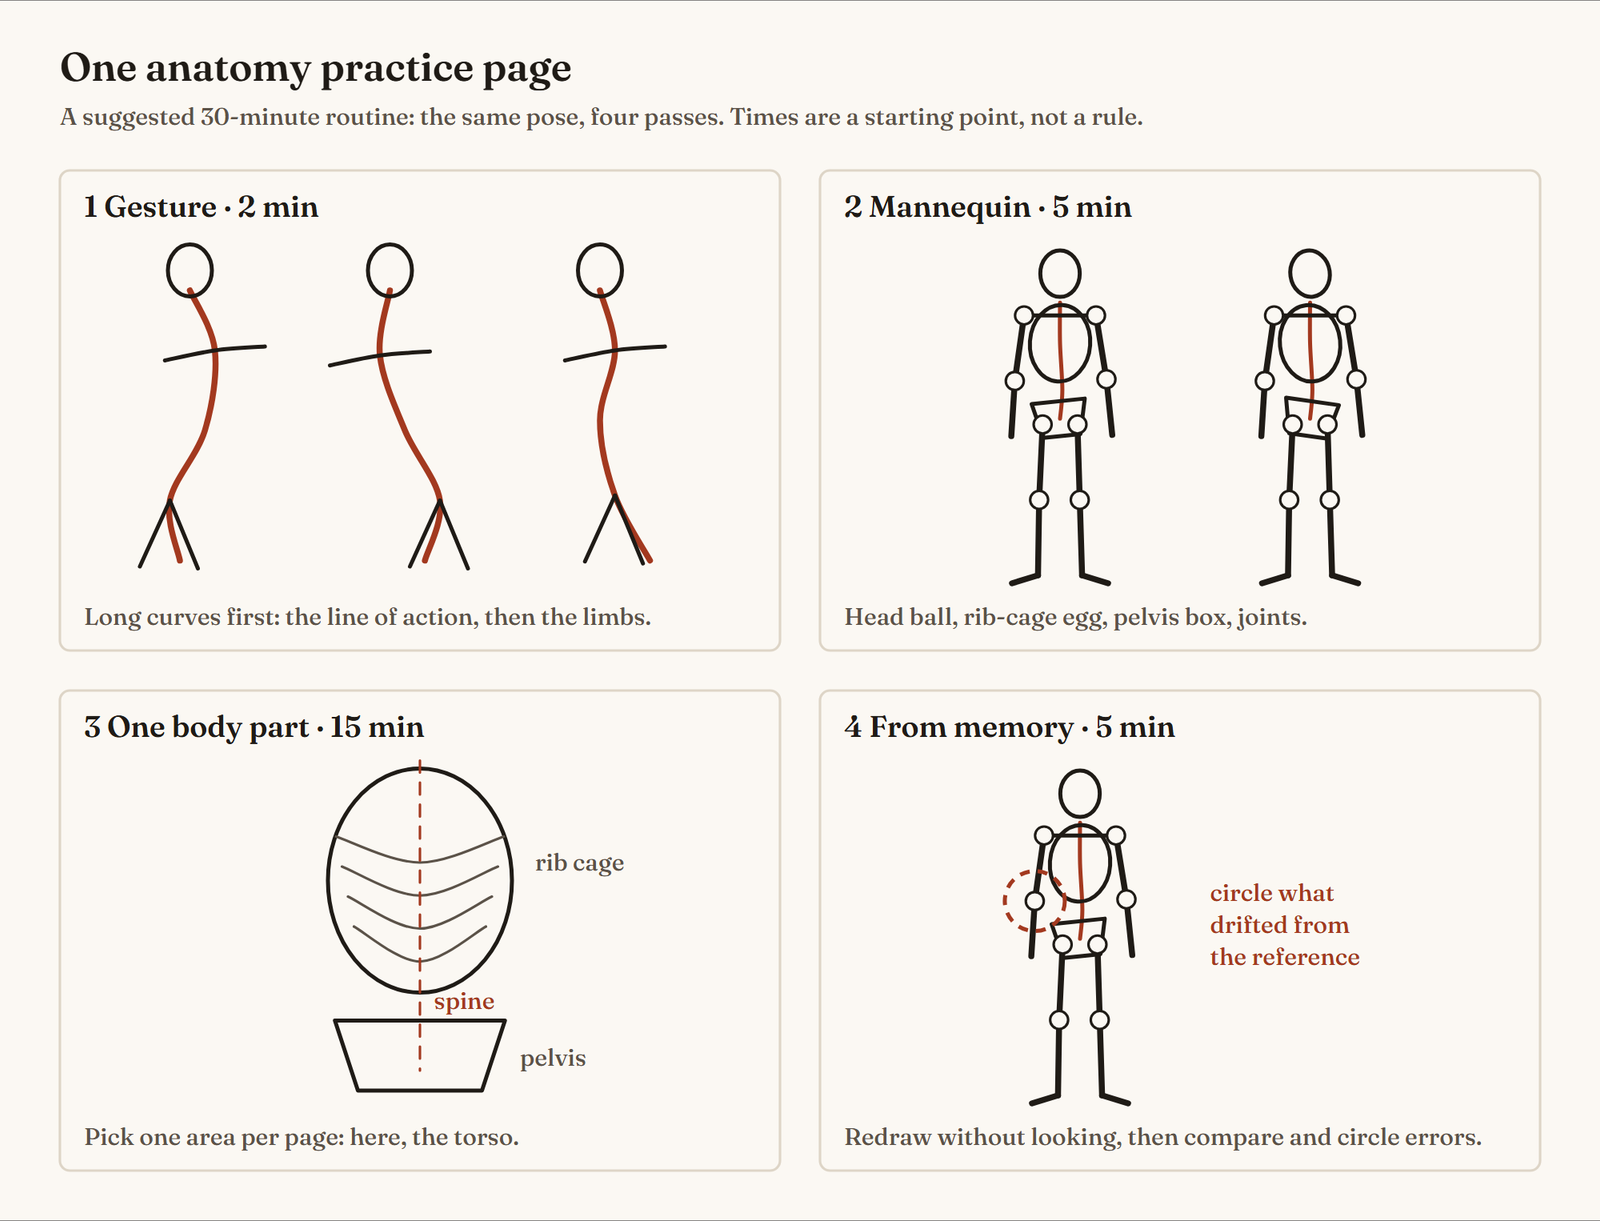
Spread the body parts over a week so each one gets attention. This is a suggested plan, not a fixed program:
| Day | Focus | Main figures on this page |
|---|---|---|
| 1 | Gesture and proportions | Line of action, head-height pair |
| 2 | Torso: rib cage, pelvis, landmarks | Rib cage boxes, bony landmarks |
| 3 | Torso muscles, front and back | Front and back torso plates |
| 4 | Arms and hands | Arm groups, hand bones |
| 5 | Legs and feet | Thigh groups, foot bones |
| 6 | Head and planes | Head planes |
| 7 | Full figures from memory, then check | Front, side and back views |
How to practice anatomy so it sticks:
- Draw from reference, then from memory. The memory drawing shows you what you actually learned.
- Circle your errors. Compare and mark the three biggest differences each session.
- Repeat the weak part. Start the next session with whatever you circled.
- Use life drawing when you can. Anatomy life drawing sessions with a model, or timed photo sessions, turn study into observation.
For a longer schedule, see our 12-week plan for studying anatomy.
How to learn anatomy for art (and why it feels hard)
Anatomy feels hard because the body is a set of 3D forms that overlap and change shape as they move, and because beginners often start at the wrong end: memorizing muscle names and copying surface detail before they can build a figure that stands. Learning in layers fixes most of that.
A simple learning path:
- Gesture and proportion first. You can draw convincing figures with no muscle names at all.
- Simplify. Learn the mannequin until you can draw it from any angle.
- Bones before muscles. Landmarks tell you where the muscles attach and where the surface is hard.
- One region at a time. Torso, then arms, then legs, then head, hands and feet.
- Use it immediately. After each study session, draw a few figures and apply the one thing you learned.
Anatomy drawing tips that help most beginners: keep studies small and many, work from simple to complex in every drawing, and always ask what is underneath the shape you are drawing. If you are starting from zero, our guide to how to learn figure drawing covers the drawing basics that anatomy builds on.
Does anime anatomy follow the same rules?
Yes, with deliberate changes. To draw anime anatomy, artists usually keep the skeleton’s logic and the landmarks, then stylize the proportions: larger heads and eyes, longer legs, simpler muscle shapes. Stylization works best when you know what you are changing, so study realistic anatomy first. Our anime anatomy guide shows how stylized bodies bend the rules.
Anatomy drawing books and courses
A book lets you study at your own pace and copy plates as often as you like. A few that artists often start with:
- George B. Bridgman, Constructive Anatomy (1920). Short, drawing-led, and focused on how masses connect. It is in the public domain and free to read on the Internet Archive.
- Paul Richer, Anatomie artistique (1890). Detailed plates made for artists; the original French plates are in the public domain and several are used on this page. An English translation was published much later; we only use the 1890 French plates.
- Michael Hampton, Figure Drawing: Design and Invention. A modern book that builds the figure from gesture and simplified forms, a good bridge between gesture and anatomy.
Whatever you choose, draw from it as you read. Copy a plate, then draw the same body part from a photo, then from memory. Drawing anatomy classes, online or in person, add feedback and a schedule, which is what most self-taught artists lack. Our roundup of the best anatomy books for artists compares the options in more detail. For books that combine anatomy with gesture and construction, see our roundup of the best figure drawing books.
Common mistakes
- Copying muscles before the figure has a gesture and proportions.
- Fix: Draw the line of action and the mannequin first. Muscles only make sense on a figure that already stands and balances.
- Drawing every muscle the same size and darkness.
- Fix: Group muscles into a few big shapes per body part and keep the small ones as quiet surface changes.
- Using the eight-head canon as a rule for every figure.
- Fix: Measure your reference in heads. Our own 3D figures measure about 7.6 and 7.8 heads; real people vary too.
- Outlining the body like a cookie cutter.
- Fix: Think in overlapping forms. Where one form passes in front of another, let its line cross over.
- Studying anatomy books without drawing from them.
- Fix: Copy one plate, then draw the same part from a photo or model, then from memory. Repeat the cycle per body part.
Practice exercise
The 30-minute anatomy page
- Draw three 2-minute gestures of the pose: line of action first, then the limbs.
- Spend 5 minutes on a mannequin of the same pose: head egg, rib-cage egg, pelvis box, joints as circles.
- Spend 15 minutes on one body part only (for example the torso): place the bony landmarks, then the two or three biggest muscle groups.
- Put the reference away and redraw the whole mannequin from memory in 5 minutes.
- Compare with the reference and circle the three biggest differences. Start tomorrow's page with those.
Frequently asked questions
How do you practice anatomy drawing?
Work in short, focused sessions: gesture first, then a mannequin, then one body part with its bony landmarks and main muscle groups, and finish by drawing it again from memory. Repeating that loop on one body part at a time beats copying whole écorché figures.
How can I get better at drawing anatomy?
Draw the same body part many times from different angles, check proportions in heads, and compare your memory drawings with the reference. Most improvement comes from spotting and fixing the same few errors, so keep notes of what you circle.
How do I learn anatomy for art?
Learn the skeleton's big masses and the bony landmarks first, then the large muscle groups of the torso, arms and legs. Study one region per week from a public-domain anatomy book or 3D reference, and use it right away in gesture and figure drawings.
Why is anatomy so hard to draw?
Because the body is a set of overlapping 3D forms that change shape when they move, and most beginners try to copy surface details before they understand the structure underneath. Simplifying the body into a few forms makes it manageable.
How do you draw anatomy as a beginner?
Start with simple shapes: an egg for the head and rib cage, a box for the pelvis, cylinders for the limbs and circles for the joints. Get the gesture and proportions right with those before you add muscles.
What is a good anatomy drawing book?
George Bridgman's Constructive Anatomy (1920) is in the public domain and free to read on the Internet Archive, which makes it an easy first book. Pick one book, and draw from it as you read rather than collecting several.
Sources
- Divisions of the Skeleton, NCI SEER Training Modules, U.S. National Cancer Institute. Accessed .
- Appendicular Skeleton (126 bones), NCI SEER Training Modules, U.S. National Cancer Institute. Accessed .
- Introduction to the Muscular System, NCI SEER Training Modules, U.S. National Cancer Institute. Accessed .
- Constructive Anatomy (George B. Bridgman, c1920), item record, Internet Archive. Accessed .
- Leonardo da Vinci, Recto: The skull sectioned. Verso: The cranium (RCIN 919057), Royal Collection Trust. Accessed .
- Rembrandt van Rijn, The Anatomy Lesson of Dr Nicolaes Tulp (1632), Mauritshuis, The Hague. Accessed .
- Albinus, Tabulae sceleti et musculorum corporis humani (London, 1749), plate 1, Wikimedia Commons. Accessed .
- Richer, Anatomie artistique (Paris, 1890), plates p. 60, Wikimedia Commons. Accessed .