The Ultimate Guide to Sketchbooking for Beginners
Part of Learn to Draw & Artist Life
Quick answer
To start a sketchbook, choose an inexpensive book that suits your medium (thin paper is fine for pencil and pen; heavier paper for markers and watercolor), date every page, and fill it with small, fast drawings: objects around you, studies, thumbnails and doodles. Use simple layouts like a thumbnail grid or one study with notes, and break the blank-page fear by ruining the first page on purpose. A sketchbook is for practice, not for perfect drawings.
Sketchbooking is the habit of keeping a sketchbook and filling it regularly with drawings, studies, ideas and notes. It’s one of the most useful things you can do as an artist at any level, and one of the hardest to start. The blank page is intimidating, expensive sketchbooks feel too precious to “waste”, and it’s not obvious what to put on the pages. This guide covers everything a beginner needs: choosing a sketchbook, page layouts that make it easy to start, what to fill it with, and how to stop fearing the blank page for good.
Why keep a sketchbook?
A sketchbook does several jobs at once:
- A practice space. It’s where you study fundamentals, try new techniques and make mistakes without pressure.
- An idea bank. Thumbnails, characters, compositions and notes you can come back to later.
- A record of progress. Dated pages show how far you’ve come, which is hugely motivating on bad days.
- A habit anchor. Opening the sketchbook every day is an easy, concrete daily habit.
None of these require good drawings. That’s the most important thing to understand about sketchbooking: the sketchbook is for the process, not for finished art.
Choosing a sketchbook
The best sketchbook for beginners is the one you’ll actually fill. A few practical choices matter:
- Paper weight and type. For pencil, charcoal and pen, regular sketch paper is fine. For markers, choose paper that resists bleed-through. For watercolor or gouache, choose heavy paper made for wet media; our guide to the best watercolor sketchbooks compares options by weight, fiber and binding.
- Size. A small book (around A5) is easy to carry everywhere, so you’ll use it more. A larger book gives you room for studies and spreads. Many people keep one of each.
- Binding. Spiral bindings fold flat and back on themselves. Sewn or glued books look nicer and allow drawings across a two-page spread.
- Price. Start cheap. An inexpensive book removes the fear of wasting paper. Upgrade once you’re filling books regularly.
Our planned guide to the best sketchbooks for drawing will compare dry-media sketchbooks in detail.
Six page layouts that make starting easy
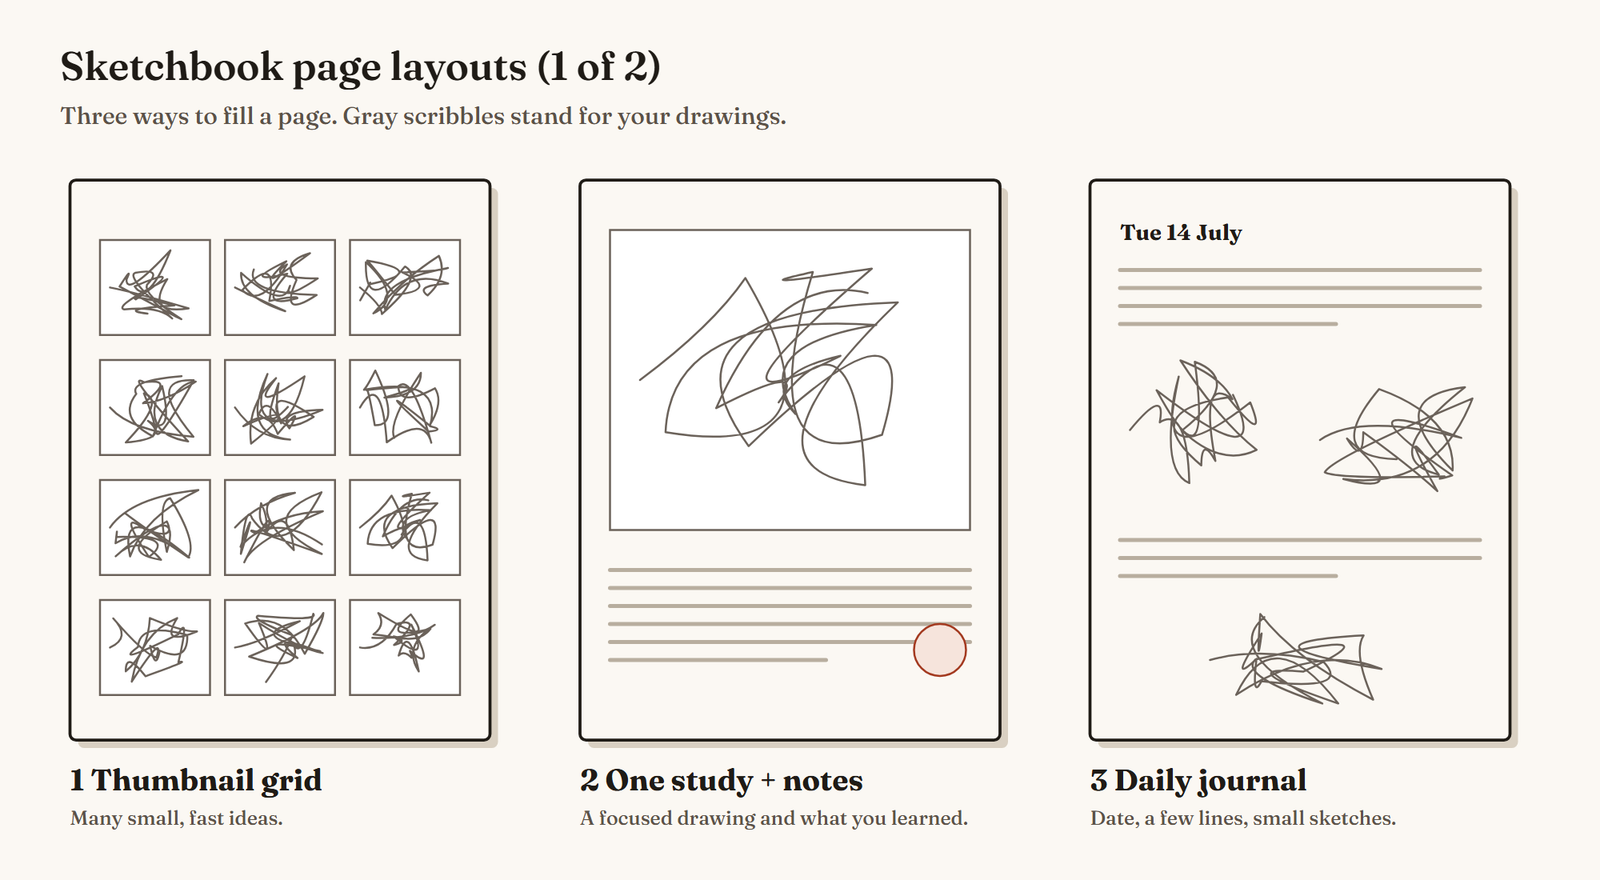
A blank page is easier to start when you already know its structure. These six layouts are simple frameworks; mix them however you like.
1. The thumbnail grid
Draw a grid of small boxes and fill each with a quick idea: a composition, a silhouette, a pose. Thumbnails are fast, so you can explore many options and stop worrying about any single one. Great for character and composition ideas.
2. One study plus notes
One focused drawing on the top half of the page, and notes about what you learned underneath. Use it for studies of a single subject: a hand, a skull, a plant, a lighting setup. The notes turn a drawing into a lesson.
3. The daily journal page
Date at the top, a few lines about your day, and two or three small sketches of things you saw. This is the easiest layout for building a daily habit, because there’s always something to draw: your breakfast, your commute, your desk.
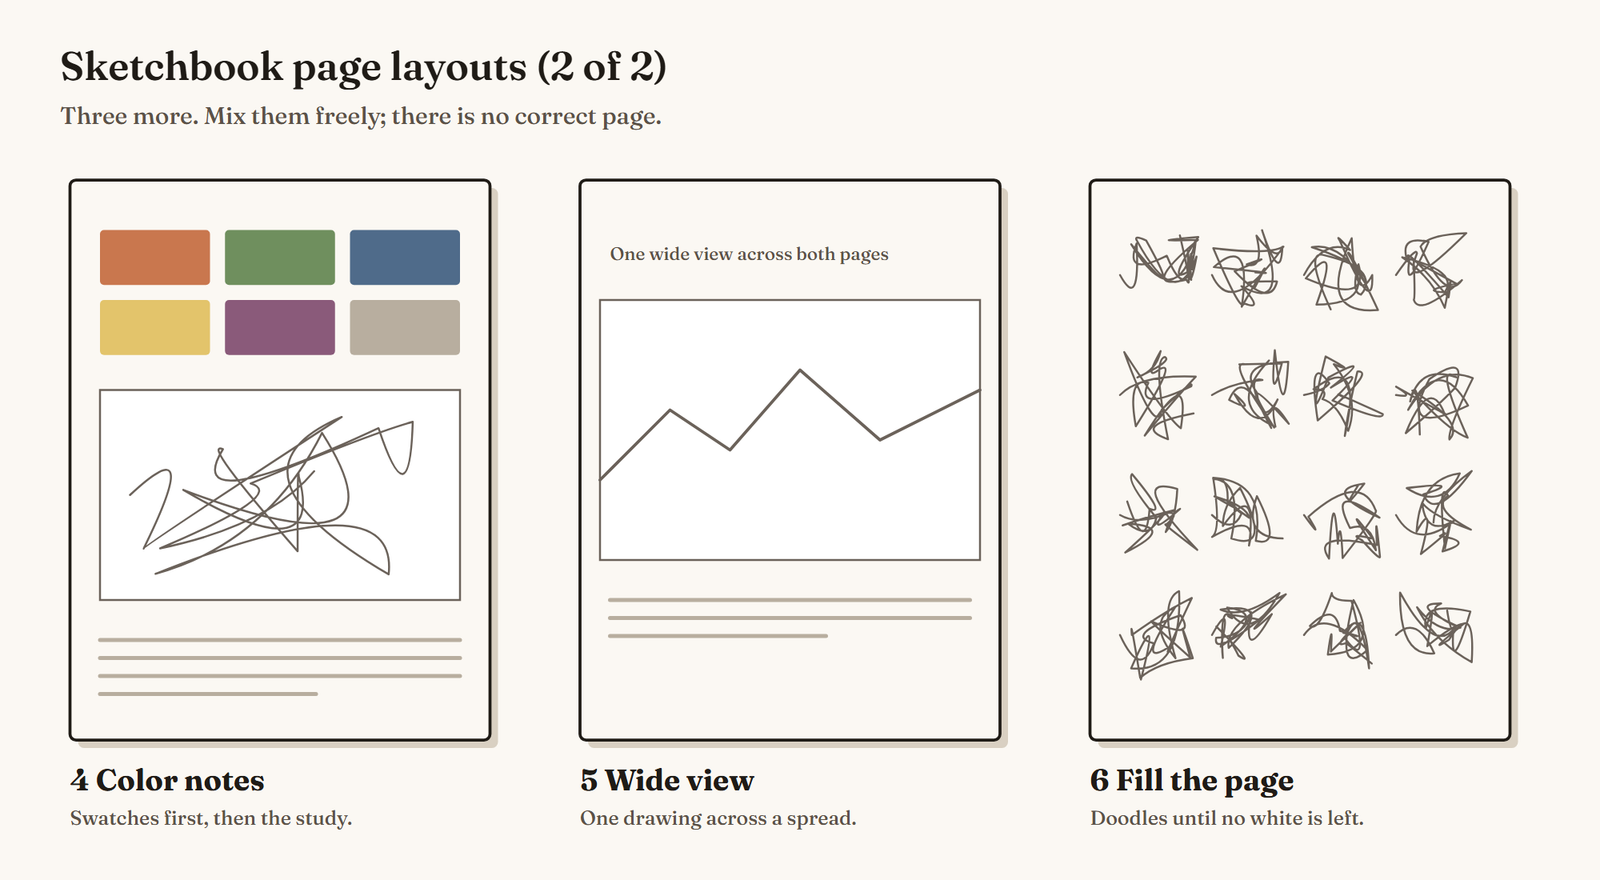
4. Color notes
A row of color swatches at the top, then a study using only those colors. It’s a quick way to learn how your materials behave and to practice working with a limited palette.
5. The wide view
One drawing stretched across a two-page spread: a landscape, a street, a room. Spreads feel ambitious and are perfect for urban sketching and environments.
6. Fill the page
Doodles, patterns, small objects and characters, until no white space is left. It’s the perfect layout for low-energy days, and it often produces surprising ideas.
What to fill your sketchbook with
If you’re not sure what to draw, rotate through these categories:
- Observation. Objects, people, animals and places from life. Drawing from observation trains your eye more than anything else.
- Studies. One fundamental at a time: perspective boxes, gesture drawings, light on simple forms, anatomy. Our guide on how to become an artist lays out the fundamentals in order.
- Ideas. Characters, creatures, stories, compositions, designs.
- Copies and master studies. Studies of artworks you admire, labeled as studies, to learn how they were made.
- Color and materials tests. Swatches, brushes, new pens, new techniques.
- Play. Doodles, patterns and drawings with no purpose at all.
A healthy sketchbook mixes all of them. If every page is a study, it starts to feel like homework; if every page is play, you miss chances to learn.
For prompts when you’re stuck, our summer drawing ideas list has 63, and our guide to drawing every day includes 20 daily prompts.
How to stop fearing the blank page
Almost everyone feels it: the first page of a new sketchbook seems too important to “ruin”. A few tricks break the spell:
- Ruin the first page on purpose. Scribble on it, spill a little coffee, write “this book is for practice”. The pressure is gone.
- Start in the middle. Nobody says you have to begin on page one.
- Use a timer. Give yourself five minutes per drawing. A short time limit means nobody expects perfection, including you.
- Draw in pen. You can’t erase, so you stop trying to be perfect and start making decisions.
- Use a layout. A thumbnail grid or a journal page tells you what to do next.
- Remember who it’s for. Your sketchbook doesn’t need an audience. You can show pages if you want, but you don’t have to.
Bad drawings in a sketchbook are a sign it’s working. Every page you’re not proud of is a page of practice you wouldn’t have done otherwise.
Building a sketchbook habit
Sketchbooks reward consistency more than talent. A few habits help:
- Date every page. You’ll see your progress and your patterns.
- Keep it visible. A sketchbook on the table gets used; one in a drawer doesn’t.
- Carry a small one. Waiting rooms, trains and cafés are full of free models.
- Set a tiny minimum. One drawing a day, even a two-minute one, keeps the habit alive.
Our guide to drawing every day covers habit design in detail, including a printable 30-day tracker.
A four-week starter plan
If you want structure for your first sketchbook, try this:
- Week 1: observation. Draw one object from life every day: a mug, a shoe, a plant, a bag. Use the daily journal layout.
- Week 2: thumbnails. Fill one thumbnail grid a day with quick compositions of your room, your street or a story idea.
- Week 3: studies. Pick one fundamental, such as boxes in perspective, gesture drawings or light on simple forms, and use the “one study plus notes” layout.
- Week 4: free choice. Mix all the layouts, including a wide spread and a fill-the-page doodle day.
At the end of the month, flip back to the first page. Most people are surprised by how much has changed in four weeks.
Urban sketching and drawing on location
Taking your sketchbook outside opens up endless subjects. Urban sketching (drawing streets, buildings, cafés and people on location) is a popular form of sketchbooking with an active community. A few tips for beginners:
- Start seated. A bench or café table is easier than standing.
- Draw the big shapes first. Buildings, the horizon line, the largest masses, then details.
- Simplify people. Quick gesture lines and silhouettes are enough; people move.
- Add a note. Date, place and something you overheard make the page a memory, not just a drawing.
Digital sketchbooks
A tablet can work as a sketchbook too, and it has advantages: unlimited pages, undo, layers and easy color experiments. The downside is that undo makes it easy to over-polish, and that a device feels less casual than a cheap paper book. If you sketch digitally, keep the same rules: date pages, use time limits, keep your mistakes and resist erasing everything.
Many artists use both: paper for daily observation and on-location drawing, digital for ideas they plan to develop further.
Sharing your sketchbook (or not)
Sharing pages online can be motivating and connect you with other artists. But a sketchbook only works as a practice space if you feel free to make bad drawings in it. If sharing makes you self-conscious, keep two books: a private one for practice and a “show” sketchbook for pages you’re happy to post. There’s no rule that says a sketchbook guide has to end with an audience; for most artists, the private book is the one that teaches them most.
Materials to start with
You don’t need much. A pencil or pen you like, an eraser if you use pencil, and the sketchbook itself are enough. Later, a few colored pencils, a brush pen or a small travel watercolor set can make pages more fun. Our guide to the drawing supplies you actually need keeps the list short, and our guide to the best pencils for drawing helps if you want to upgrade.
Common sketchbook questions from beginners
Pencil or pen? Either works. Pencil is forgiving and good for learning proportions; pen forces decisions and builds confidence. Many people alternate, or start a page in light pencil and finish in pen.
Does every page need to be filled in order? No. Skip around, leave pages blank, come back later. A sketchbook isn’t a test.
What if a sketchbook looks messy? Good. Messy pages usually mean experimentation, which is exactly what a sketchbook is for.
How long should one page take? Anywhere from two minutes to an hour. Short pages build the habit; occasional longer pages build depth.
What to do with full sketchbooks
Keep them. Number the spines, store them together, and look back through them every few months. You’ll see your progress, rediscover forgotten ideas and notice which subjects you return to again and again. Those patterns often point to the kind of art you most want to make.
Sketchbooking isn’t about producing beautiful books. It’s about showing up, page after page, and letting the practice add up.
Start today: pick up whatever sketchbook you have, date the first page, and draw the nearest object for five minutes. That’s sketchbooking. Everything else is just doing it again tomorrow.
Common mistakes
- Buying an expensive sketchbook and being afraid to use it.
- Fix: Start with a cheap book; you'll draw more freely.
- Tearing out pages you don't like.
- Fix: Keep them. A sketchbook is a record of practice, not a gallery.
- Only drawing finished pieces.
- Fix: Fill pages with quick studies, thumbnails, notes and doodles.
- Waiting for a good idea before starting a page.
- Fix: Draw what's in front of you. Ideas come from drawing, not before it.
Frequently asked questions
What sketchbook should a beginner buy?
An inexpensive, medium-sized book with paper that suits your medium. For pencil and pen, almost any sketch paper works; for markers or watercolor, choose heavier paper made for wet media. The best sketchbook for beginners is one you'll actually fill.
What should I draw in my sketchbook?
Everyday objects, people and places from life, studies of one fundamental at a time, thumbnails for ideas, color notes and doodles. Mix observation, study and play.
How often should you use a sketchbook?
Little and often. A few minutes a day builds the habit faster than one long session a week.
Is it okay to have bad drawings in my sketchbook?
Yes. A sketchbook is a practice space. Bad drawings show where you're learning, and keeping them lets you see your progress later.